Sunday, March 23, 2014

Anime Boston Commission

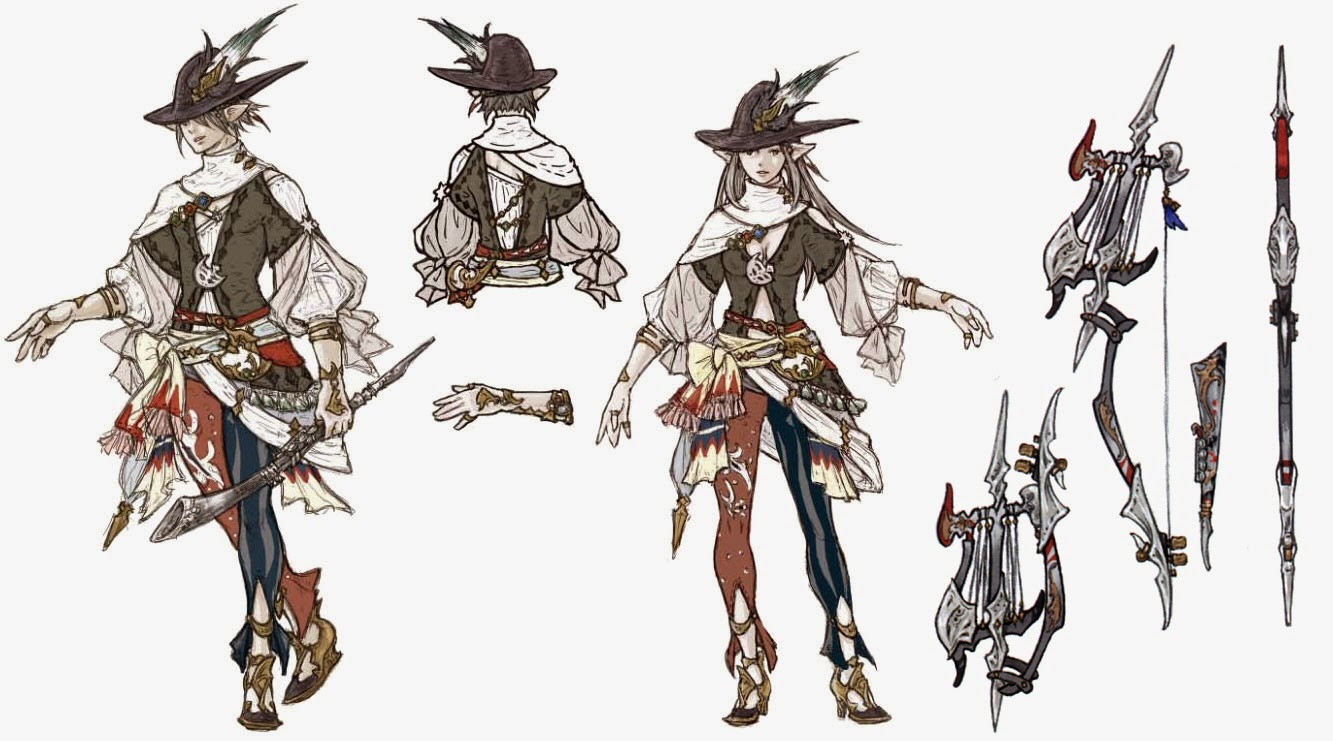
I've alluded to a commission I've been working on in a couple previous posts but I haven't gotten around to even introducing it yet! I was asked to make a costume for the Anime Boston convention of a character from Final Fantasy XIV. I've never played the Final Fantasy game series so I don't know much about the characters at all, but I was provided with a very detailed sketch of the character called a Bard Relic.

Concept art for the character

It looked rather complicated at first but I was able to pick it apart into smaller pieces and lots of layers. It still took me about twice as long as I expected to sew, but that is always the case. I'm absolutely horrendous at estimating how much time a certain project is going to take. I started out with some of the simpler layers and made good progress at first, but it was the smaller details that bogged me down.


I made the little capelet out of some heavy white linen. The little brooch is sculpey and rhinestones, and there's a couple really pretty clasps on the side opening.
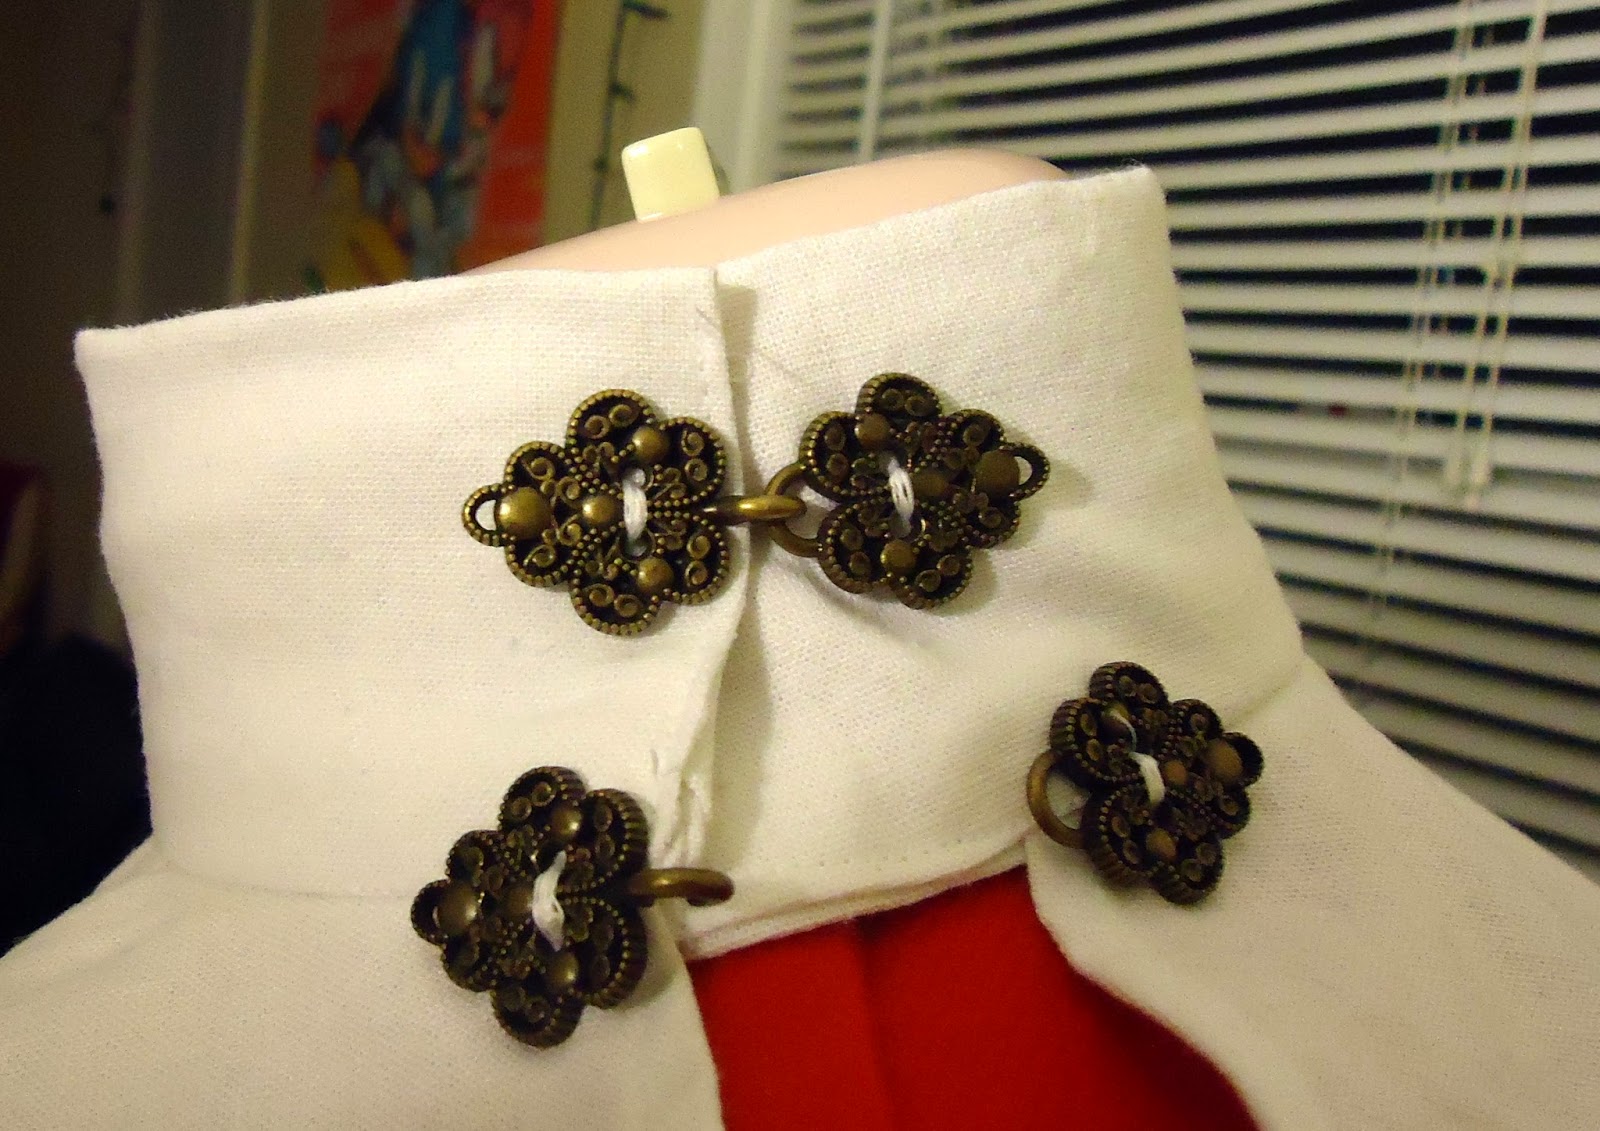

My mannequin has a fat neck, but you get the idea. The hat was a little more complicated to make and was my first foray into haberdashery. I started with some felt and stretched it over a makeshift hat block to get the crown. The brim is sewn to the crown with a piece of wire running through the seam, and another piece of wire at the edge of the brim to keep the unusual shape it has. Some feathers complete the look.


The pants were a fairly straightforward piece as well. They're made out of stretch jersey to be a little more form-fitting. I used cut up lace and some bridal appliques to recreate the floral design on the red side. The striped blue fabric I was lucky enough to source a fairly good match for online.


The main bodice was the most difficult and time consuming of the pieces. It's open in the back and just barely closes in the front making it very difficult to fit. It has layered, poofy sleeves and lots of tiny little diamond trim detail. The sleeves were so heavy I had to add a piece of elastic to the top of the shoulders to keep them from getting pulled down. I couldn't find an appropriate trim, and trying to sew dozens of little grey diamonds would probably result in my own demise so I settled for painting the detail on.


The brooch is made out of sculpey again, and there's a couple more in the shapes of stars on the sleeves. The sashes also got the paint treatment.


There's a small white wrap-around half skirt with little gold bead details that I completely forgot to take separate pictures of. There's also a small red bag that goes around the waist.


Put all together at last I think it came out very successfully! This is definitely one of the more complicated cosplays I have done, second only to Darth Maul in my opinion. It was a nice challenge of my sewing skills and my resourcefulness in translating drawings into wearable clothing. That being said, I'm glad it's over and done with and I can get back to my historical comfort zone!

Saturday, March 22, 2014

Dyeing for Purple

Progress on my bodice has been slow and painful. A costume commission I had taken on for Anime Boston took much longer than I had anticipated, leaving me with just about twenty-four hours to sew my bodice before the challenge date. No problem at all I thought. I busted through most of the earlier challenges, I even made my corset in the allotted time so a bodice should be no big deal. I was getting too cocky.

A week later and the bodice is still half finished - no bones, no sleeves, no buttons, no finished edges. A strange ennui had hit me making it hard to even get out of bed some days. I struggled just to get to my sewing machine all week long, only taking little baby steps every couple of days. I'm feeling better and hoping to have it finished this weekend though.

Despite being stuck far behind on the bodice challenge I'm not letting it deter me from continuing on. For the fairytale challenge I'm planning an Edwardian dress inspired by a Japanese tale and the dresses of the design house Callot Soeurs of Paris, France.

For this dress I really wanted to use authentic materials. The main inspiration dress is made from silk charmeuse. I really didn't want to settle for a synthetic alternative but the prices of silk were a bit steep for me. Then I found out that the dye and fabric company my mother loves, Dharma Trading Company, sells quality silks for a steal! The only catch was that they only carry black or white fabric being mainly a dye supplier. Looks like it was time to try my hand at dyeing.

The dress I want to make is mainly black and purple so I bought a few yards of black and a few yards of white silk. I decided to go with the iDye packets sold on the website since they didn't require mixing of chemicals like the more specialized dyes my mother uses and they could be used stovetop since I don't have access to a washing machine. A recent recommendation from The Dreamstress on her blog informed my decision as well.


I sacrificed my enamel canning pot to use for the dye. The directions said to put the fabric in the water when it was warm and then bring it to a simmer and leave for half an hour. By the time it had even gotten to a simmer the fabric had been in the pot closer to an hour and I was getting worried. It looked so dark! I let it simmer for twenty minutes and then pulled it out.


Straight out of the pot and still sopping wet it looked almost black. When the light shone through it though it was a brilliant purple so I help out hope that it would dry to the right purple.


Waiting for the silk to dry I took a look at the big pot of dye and got to thinking. The flannel petticoat I had made for the pink challenge was all cotton material, and I'd much rather have a purple skirt than a pink one. It wasn't a very precious piece either so if I messed it up it wouldn't be the end of the world. I decided to chuck it in the pot and see what happened.


I was a little impatient with the skirt, I probably only left it in there fifteen minutes or so. Straight out of the pot it was a nice bright shade of purple. It lightened to a bit more of a dark periwinkle as it dried, but I still like it better than the pink!


Meanwhile the silk was getting lighter and lighter as it dried...


About halfway dried it was almost perfect for the color I wanted.


Fully dried it was a little lighter than I wanted but such a rich, deep shade that I couldn't complain. The actual shade is in-between the last two pictures, it is a very hard purple to capture and properly display on a screen! The tint of it is more of a reddish purple than I wanted but it is gorgeous!

All in all it was a successful experience that has left me wanting to dye more fabrics! Since Dharma has such reasonable prices on natural fiber fabrics I might find myself dying things more often in the future.

Friday, March 7, 2014

Sudden Inspiration

One of my biggest goals this year is making completed ensembles that I can use for a portfolio. I'm really hoping to find a job in the field of costuming in the near future. I already free-lance and take commissions for costumes but requests are few and far between at the moment. I would love to get back into theater, or use my art degree to get a job at a museum. My options are varied, but I need to take the initiative to go after them. I want a portfolio of fully realized costumes that I can be confident in, but all I have right now are bits and pieces.

With the bodice challenge coming up in the Historical Sew Fortnightly I decided to get a start on an 1880's dress I had on my costume list for the year. I had only a vague idea of what I wanted cobbled together from a dress in Janet Arnold's Patterns of Fashion 2 and a large quantity of navy-blue pinstriped cotton/poly suiting purchased on a clearance impulse.

The fabric in question looked and handled enough like a proper Victorian fabric and was priced ridiculously cheap enough that I snatched it all up and decided to plan the dress later. It's a very dark navy, almost black, and the pinstripes are on the silver side with a very silky finish. I considered pairing it with white for a sort of nautical look, but could never quite settle on what exactly it should look like. I purchased the Truly Victorian French Vest Bodice as a starting point planning to mock it up this weekend and then something came along that blew all my plans out of the water.

I found this dress:


It's an 1885 evening gown from the Metropolitan Museum of Art. I hate the feathers but I absolutely adore the color and design! The dress hails from Boston, Massachussettes, which I live just outside of so I feel a little extra connection to it. The very best part though is that I have very similar fabrics in my stash!!

I had been lamenting the fact that I was going to end up with such a stark, nearly colorless navy and white dress when the 1880's especially was all about color! This dress has made me much more excited to get started on the project. I have a gold and pale blue upholstery fabric that's been sitting in my stash since my senior thesis show three years ago in a plausible Victorian pattern. I just purchased a lovely cotton fabric in the perfect pale blue a few months ago. I might even have some trim in the same gold and blue! It will be great to get these fabrics out of my stash and into a costume since they are some of my favorites.

I'm really hoping to finish the dress by the end of March. I also need to make a dress for the Fairytale challenge by the end of the month which I have a simple ensemble planned for. I will really have to stay focused and on top of myself to get it done, but I've worked with more impossible seeming deadlines before! If I finish both dresses in time I'll have enough material to do a photoshoot and start my professional portfolio. And then I can take it easy for a week or two!

Saturday, March 1, 2014

Underneath It All

I thought I would have my entry for challenge number four done in no time at all, but here I am posting about it the day it's due! I did finish it two days ago, so I'm still trying to keep up my momentum of early finishes, but I'm becoming a little worried about my schedule for the next two challenges. Procrastination was my biggest problem with this challenge entry, and once I finally got back into sewing I found it taking a lot longer than I had planned. It's time to get back on top of my sewing projects!

For the Underneath It All challenge I made my most historically accurate corset yet. I've made a little over half a dozen corsets now starting all the way back in high school when I made my first corset from the Civil War era Simplicity pattern. Boy was that corset a sight! I had no idea what a busk was or where to find one so I used large hooks and eyes for the front, and plastic boning all throughout. My skills have improved quite a bit since then and this corset really shows it.


I'm calling this the Valentine's corset because of the deep red color and the lace trim at the top having little hearts patterned into it. This was my first attempt at flossing a corset and my roommate pointed out that the pattern I chose almost looks like little hearts too! I had also thought I would have it finished by Valentine's Day but that didn't happen.


This is my second corset made from the Truly Victorian pattern as the hips were too small and the fabric too weak and warped on the other one I made. I also went down a size in the bust which I'm realizing might have been a mistake but I can go back and add darts if it bothers me too much. The large gap in the back is because I've been gaining a little weight and I'm hoping to start waist training to reduce my waist back to where it was. Wearing the corset at meal times is already helping me stop overeating. The corset is also fairly stiff still so I've only been able to cinch it in a couple inches.


As far as historical accuracy goes this corset is getting pretty close to perfect. All of the materials are cotton including the trim and the thread for the flossing. The bones are metal and it is machine sewn but both of those are acceptable for the 1880's. The only thing I used that is not historically accurate is a pair of lacing bones. I always seem to rip the eyelets out of my corsets, I guess I'm a little too rough on them when lacing. The lacing bone will prevent the eyelets from ripping and you can't really tell it is there when viewing it, so it is still aesthetically accurate.

The Challenge: #4 Underneath It All

Fabric: Cotton twill

Pattern: Truly Victorian 110

Year: 1880's

Notions: Busk, metal bones, lacing bones, cotton floss, cotton eyelet lace, bias binding, thread

How Historically Accurate is it? About 90%

Hours to Complete: maybe 8-10

First Worn: two days ago

Total Cost: Bones and Fabric came from the stash, the rest cost maybe $25

Saturday, February 8, 2014

Pink

Pink is not one of my favorite colors, so when the pink challenge came up in the HSF '14 I decided the best course of action would be to make some undergarments. It's been dreadfully cold in my neck of the woods the past few weeks and the idea of making a cozy long flannel skirt started working its way into my head. I had already made a new Victorian petticoat for my bustle dress but I have plans for some Edwardian outfits later in the year that I didn't have any petticoats for.


After a little google-ing I really liked the silhouette of this petticoat example. The first website I found the image on made it out to be 1900's but other webpages I've seen since making the skirt label it 1890's. I found some nice pink flannel in a shade that wasn't too outrageous and set to work.


I started with my mother's old Folkwear walking skirt pattern as a base. I had used it last year and found that it was way too small for me even in the largest sizes, so the first order of business was enlarging each of the panels. Once they were enlarged I laid them out to cut a curve to make it shorter in back and longer in front. Once all the panels were cut out I had a moment of panic when I realized there was barely any fabric left for the ruffle. The panels had taken more than I estimated, and the flannel fabric was less wide than fabric I usually buy so my estimates were off by a yard or two. I was able to squeeze out just enough to make the barest ruffle all the way along the hem, but it is not as full or as long as I had hoped for.


The back doesn't have that nice flare to it that I wanted, but I'm very happy with the skirt otherwise. It's very warm and super comfortable, I've been lounging around the house in it for a couple weeks now. It's nice enough to go out in public with too, though I'm not usually too fond of being seen in public wearing pink. Since I intended to wear it as part of my modern wardrobe as well I finished the skirt with a placket and button. Due to the shortage of flannel I couldn't find a scrap large enough to make the waistband out of, so the white and blue striped fabric from the last two challenges is making another appearance here. I'm starting to think all my challenges will have this fabric, more scraps of it just keep appearing!


The button is a cute little carved piece that's supposed to be a recreation of 1900-1910 style buttons. I think it's supposed to look like mother of pearl maybe, but is most likely made out of plastic.


 The Challenge: #3 Pink

Fabric: Flannel

Pattern: Modified Folkwear #209 Walking Skirt

Year: 1890's/1900's

Notions: 1 Button, Thread

How Historically Accurate is it? I didn't do a ton of research on this one but probably 75% at least

Hours to Complete: Including pattern drafting probably 4

First Worn: A couple weeks ago

Total Cost: I think $25 for the fabric and $3 for a set of two buttons

Monday, January 27, 2014

Pretty Pearls

Ever since reading about The Dreamstress's princess inspired pearl bracelets I've been dreaming of a pair of my own. I've always loved pearls and don't often see them as bracelets. I also haven't ever come up with a good excuse to splurge on some real pearls for myself.

While shopping for supplies for another costume I spied strands of fake pearls on clearance for 97 cents each! I decided on impulse to buy them, and a quick scan of the rest of the bead department turned up two sparkly little clasps for $3 each. I couldn't resist and as soon as I got home I started stringing the pearls. A couple hours later and I had the prettiest little pearl bracelets!


The clasps are magnetic which I'm not thrilled with as they tend to fly off every once in a while, but they hold well enough. Even with the modern clasps they look historical enough in aesthetic that I could probably wear them with several time periods. I don't really have any accessories for my outfits so far so these will probably be seeing a lot of use as I complete more costumes!

Saturday, January 25, 2014

Innovations

I got some good sewing momentum going at the beginning of this month, finishing the first two challenges almost simultaneously. I posted about the re-made petticoat already for the first challenge, but what I didn't mention was that underneath it in the pictures was my completed second challenge! After struggling with ideas for a few weeks my imagination was sparked by a book my mother got me for Christmas that mentioned the crinoline and what an important fashion innovation it was. Since I don't really make costumes from when the original crinoline was popular I decided to go with its descendant/successor more commonly called a bustle nowadays. Thanks to a great tutorial from American Duchess I was able to complete a "Lobster Tail" bustle for my planned 1880's dress with relative ease.


The bustle is made from the same subtly striped white cotton/poly blend that the petticoat is made from. While sorting through and organizing my stash at the beginning of the year I found that I still had a yard or two of this fabric that had been untouched when making the petticoat last year. It was exactly enough to squeeze the bustle pattern on to with enough excess for the two large ruffles at the bottom. The smaller ruffles are strips that had been cut out to make a second ruffle on the original petticoat that I gave up on after struggling forever with the first ruffle. Since it was the very last bit of this fabric I decided I might as well use it up, you can never have too many ruffles! I had already cut out the two large ruffles for the bottom before I found the extra small strips or I probably would have made them all the same size, not that the way it turned out bothers me at all.


Being really excited to get the bustle together and being a little short on funds I sort of improvised on the boning. I had a roll of spiral steel for corsets laying around in the stash and I thought maybe it would work for the bustle. It holds up alright on the lower hoops, but the top one tends to buckle if any pressure is put on it so they will have to be replaced when I get the time to order some proper hoop boning. I'm hoping stiffer bones might give it just a little more 'oomph' in the back. Other than the boning I'm completely pleased with the bustle, and bunny is too.


 The Challenge: #2 Innovations

Fabric: Cotton/poly blend

Pattern: Tutorial from American Duchess

Year: 1880's

Notions: Thread, twill tape for ties, boning

How Historically Accurate is it? Besides the poly content of the fabric I'd say mostly accurate

Hours to Complete: About 3 I think

First Worn: Not yet

Total Cost: All stash items, so $0 for now but new boning is going to cost around $15 I think

Keeping my momentum going is my main goal for now. I've finished the third challenge already and have my fabric and plans for the fourth. I'm really excited to get a lot of these pieces done but am trying to be mindful of the six week guideline for starting projects early. I'm trying to get some things out of the way as soon as I can to leave myself a buffer zone in case something throws me off later in the year. I have a few extra historical pieces outside of the fortnightly challenges that I want to get done as well, and I've just received a commission for a cosplay costume for Anime Boston so keeping on top of things is essential!