Sunday, February 24, 2013

Embellished!

The 1930's dressing gown is finished! It ended up taking me way longer than I thought it would, but it turned out great! It gave me way more trouble along the way then I thought it would, but first let's get to the facts.


The Challenge: Embellish

Fabric: 4 yards Satin, 4 yards Organza, 1/4 yard pleated lace fabric

Pattern: none

Year: 1930's

Notions: 6 yards wide lace trim, 1 yard narrow lace trim, 6 satin buttons, elastic

How historically accurate is it? 90% 

Hours to complete: 11

First Worn: Not yet

Total cost: $80


The first part of creating this gown went fairly easy. I drafted out a pattern for the waistband and top that went together easily enough. I even took the time to put pockets in the gown, something I always forget and always regret later. Once I pleated the skirt on to the rest of the gown it looked all wrong though. Either I had been too generous with the cloth in the skirt or I should have gathered instead of pleating. It looked so poofy and so completely not the right silhouette for the 1930's. I had put so much work into the pockets and pleats though and time was running short, so I just blazed ahead hoping it would work out. 

I found some gorgeous lace for the hem

At this point I didn't even want to add the lace to the waistband, It just seemed like too much effort for something that wasn't working out right. The lace was such an important part of the original design though that I figured out a quick and lazy way to add it on. I'm so glad I did because it completely changed the dress. It instantly brought the dress back to the right time period, still a little on the poofy side but in a way that I could live with. The lazy way of adding the lace looked fine in the front but I might go back and tweak the back a little, it's not quite right. 

The back lace needs a little fixing

After the lace went on it was a quick job to add the sleeves and finish the gown. The organza I bought is a little stiffer than I would have preferred, making the sleeves stand out when I want them to drape more, but it's not the worst thing in the world. There's also a layer of organza in the skirt of the dress but you can't really tell it's so see-through and the same color as the satin beneath it.


The little buttons I found match just about perfectly, though this dress is the most difficult color to properly photograph! It's not yellow at all like some of the pictures show, it's more towards an ivory color but the store called it champagne.


I also got a chance to use one of the fancy stitches my machine is programmed with. I used a pretty little satin scallop stitch to finish off the neckline with a bit more detail. All in all I'm very happy with how this dress came out, It's almost too pretty to just wear around the house! 

Saturday, February 23, 2013

Peasants and Pioneers Inspiration

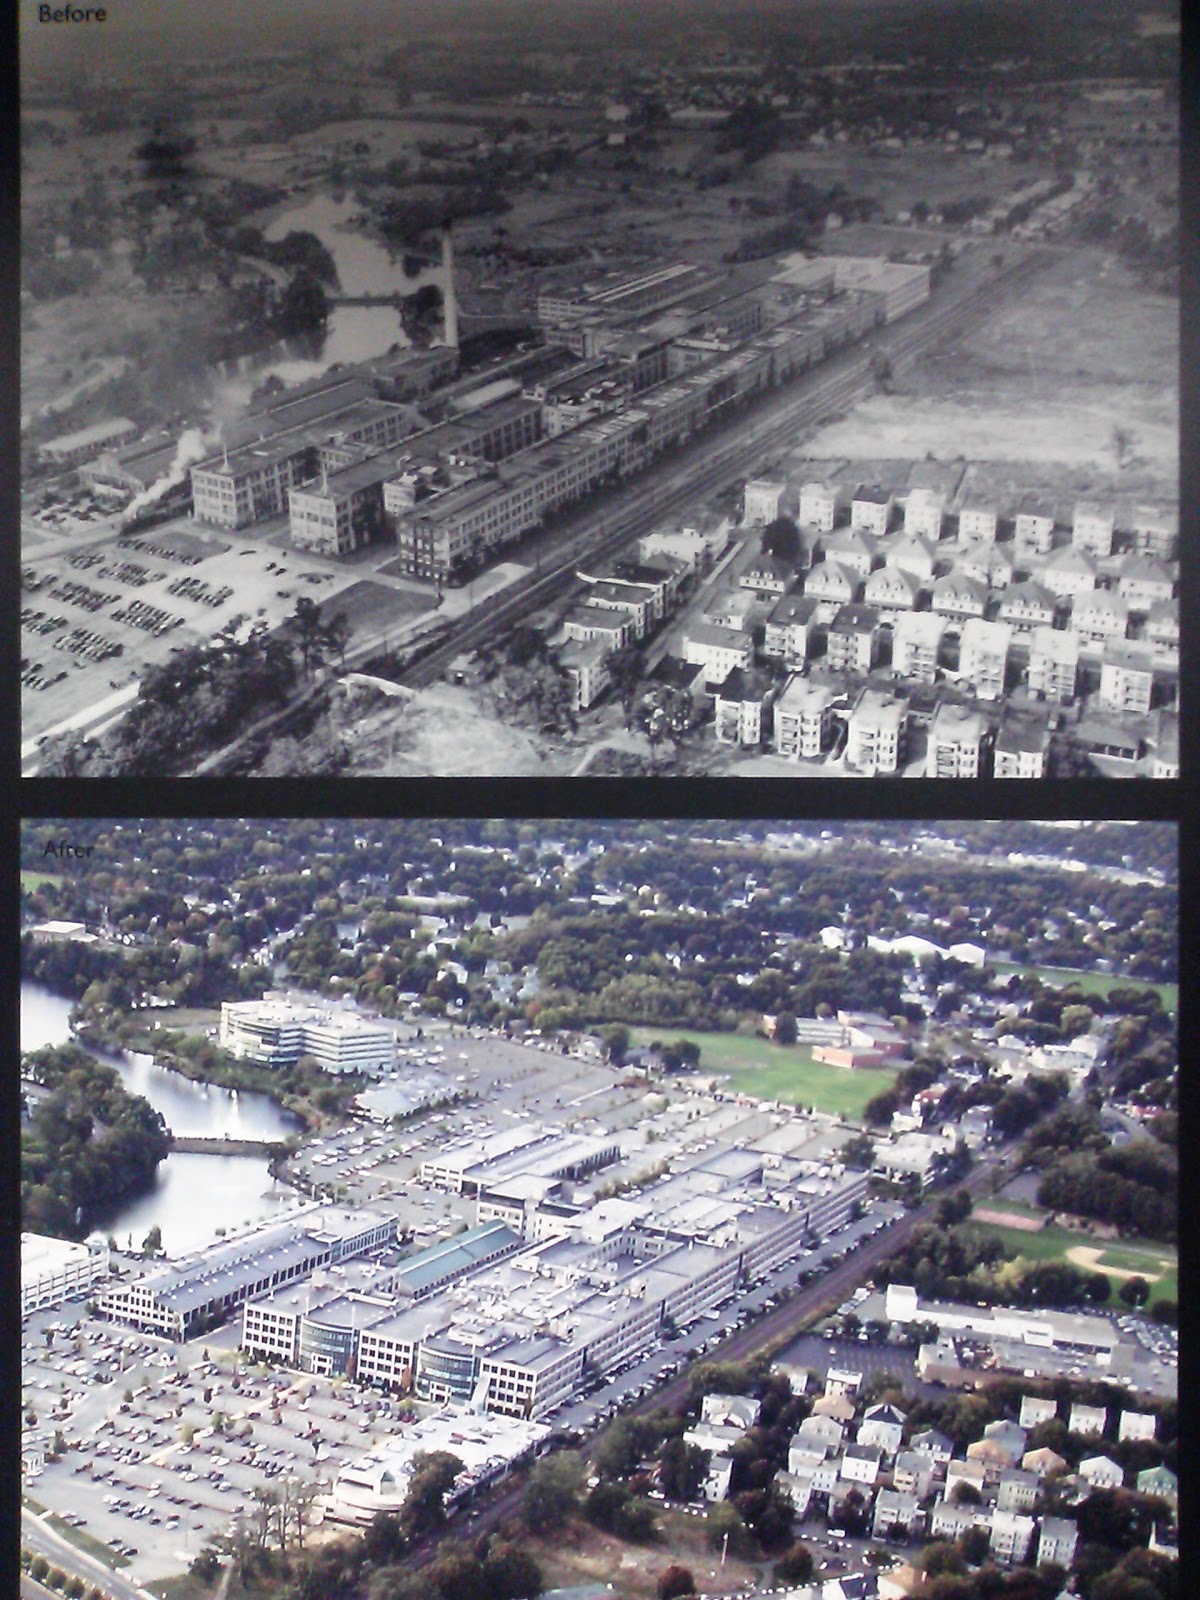
The cafe I work at is located in a rather ridiculously large business park that is of particular historical interest. Now called the Cummings Center, it was once the United Shoe Machinery Corporation built from 1902-1906. The United Shoe Machinery Corporation was of particular importance in the early 20th century. It was one of the first 3 international companies formed with branches in the United States, United Kingdom, France, Germany, Canada, South America and Asia by 1905. They held a near monopoly over the shoe manufacturing industry. More complete information on The Shoe, as it was called, can be found here since the reason I bring it up is for the photos.

When Cummings Properties purchased the then-abandoned factory building in the 1990's they worked closely with the Beverly Historical Society to preserve the history of this important landmark. Many artifacts from the old factory are on display in the halls of the business center, along with enlargements of historical photographs. The photographs of course, are why I've brought this subject up.

A comparison of the old and the modern building

Every morning when I go in to work and every afternoon when I leave I get to walk by the gorgeous old photographs on the wall. There are a lot of pictures documenting the building of the factory, but the ones I am most interested in are of the people. The United Shoe Machinery Corporation employed nearly 4,500 employees in 1910. Of those thousands there were 100 female office workers and another 70-80 girls who worked in the factory itself. A company brochure claimed that the girls all "begin their work ten minutes later than the men and leave ten minutes earlier, so that a proper distance is maintained between the sexes as they enter and leave the factory."


My favorite photograph by far is one of the centerpieces of the Cummings Center. Located right next to the leasing office near one of the front entrances is the only dated photograph. It is an enlarged image of all of the United Shoe workers in front of the factory in 1911. The best part about it is that all the female workers are standing at the front, giving a clear view of their dresses! The photo is behind glass to protect it, but I did my best to get some detail shots of the workers to share.

A great shot of some full outfits


Some of the factory girls sitting along the bottom


I love these blouses!


And this woman's spunk!


Another of my favorite photographs is in the hallway I walk down every day.


I suspect this is a picture of the USM gun club, one of many clubs that the factory maintained for it's workers. One of the astonishing things is that they catered to both male and female employees, at least for a while. As the Cummings Center website explains "The new clubhouse was turned over to the men, however, "a few hours before the bells of the New Year tolled in 1911," by USM Vice President George W. Brown. "Inside are a theater, an auditorium, a library, locker rooms, bowling alleys and cozy little rooms for the women who may congregate with their sewing or other pleasant diversions so dear to the feminine heart," NEW ENGLAND Magazine reported (emphasis added)." 


This was one of the few images I found with any sort of description. The placard provided with this photo is titled "Last Day of Employment" and goes on the describe "Miss Lillian Anthony is shown at her desk here at USM on August 28, 1915 at her going away party. In those days it was customary for a young woman to stop working outside the home after marriage. At USM the celebration was akin to a modern-day bridal shower with gifts of tableware and dishes given by co-workers. Note the "shoe" and the twin dolls decorating her desk. Lillian Married Frank Boothroyd and seven years later on july 10, 1922 had twin boys named Harold & Howard." This photo was donated by one of those twin boys still living in the area, an old USM employee himself.

A close-up of Miss Lillian, loving those
buttons on her skirt!


Some ladies having tea in what I'm guessing is either a breakroom or one of the clubhouses. I really wish they had taken the time to label more of the photographs!! I found a couple more photographs on their website that I didn't find in my wandering of the main building that are at a better quality.


This one is undated and just labeled "USM Girls" but I love those striped skirts! I'm guessing this might be from the 19-teens though since the blouses still have that little pooch popular in Edwardian fashion. Can anyone better at dating fashion correct me? 


This is a great image of some probably immigrant workers building parts of the complex. The factory is built very close to the ocean and this is some sort of water-related thing I forgot the name of since I didn't take a picture of the placard it came with, but I do remember that it mentioned that this structure still stands today.


Here's an image of the thousands of workers employed to build the factory. I believe that this was one of the most architecturally advanced buildings of it's time using a new technique of reinforced concrete to build it. 


And here's an image of the factory in operation. I love the silhouette of that young gentleman in the front.

Now the reason that I bring this all up at this particular moment in time is because of the next challenge approaching in the Historical Sew Fortnightly, Peasants and Pioneers. I have decided that I want to recreate one of the pioneers of the workplace, the brave women at the turn of the Twentieth Century that paved the way for women to enter the workplace and eventually led to the women's rights movement. I also really like the idea of paying homage to the women who once walked the same halls I walk today. 

I actually threw together a quick and dirty version of one of the old USM workers for this past Halloween since our boss allows us to dress up at work. I used an old skirt of mine and bought a blouse from a store, but the blouse did not fit right making my chest look rather swollen and misshapen. Only a couple people understood the costume, but I had fun.

The thrown-together costume

To try and stick with the spirit of Peasants and Pioneers as best I can I want to make a very basic walking skirt and simple blouse. I want to keep the clothes practical and plain, something that a working-class girl would wear. I have a pattern from Folkwear to use for the skirt, #209 Walking Skirt and I was considering buying their Gibson Girl Blouse pattern before deciding that was probably too fancy for the challenge. Instead I'll do some more research on blouses of the time and hopefully either find a more practical pattern or be able to come up with one myself based on images.

Wednesday, February 20, 2013

Satin and Lace

I finally got to the store to pick up supplies for the Embellishment challenge, and what fun it was! I knew I wanted to make a very pale colored dressing gown but I didn't want to go pure white. I was considering a powder blue, but as I walked past the bridal collection of fabrics a gorgeous champagne satin caught my eye. I never would have thought of champagne but it ended up a perfect choice as there are many examples of 1930's dressing gowns in the same family of pale peachy colors. I found a sheer champagne to match since I wanted to layer an opaque fabric for modesty and a sheer floaty fabric for embellishment.

All the pretty lace and satin waiting to be used!

Next it was on to lace, something I could happily spend a small fortune on! I restrained myself and picked out just two types of lace; a large somewhat ruffled one for hems and a flat one for wherever else I wanted lace. I also grabbed a spool of a white criss-cross trim that I'm thinking more and more that I might leave out of the design, but it will be great for another project I'm sure. 

Buttons were an altogether dilemma, I went back and forth between so many different styles. The first ones that caught my eye were pearl and gold. I absolutely adore pearls, but the gold accents were just too bright and clashed with the champagne too much, and they got scrapped. I finally settled on some simple small satin covered buttons that match the fabric color fairly well. 

I also finally settled on my main design inspiration for the gown. Etsy was actually a great source of inspiration images since there are a lot of vintage clothing sellers, and some of them are fairly trustworthy with their dating of garments. I found a style of dressing gown that I really liked had a fitted triangular waist, and then I found a bridal dressing gown and nightgown set that I want to base most of my dressing gown on.

1930's chiffon dressing gown
I love the flowing sleeves and trailing hem, and the colors are similar to the ones I chose. I even have a lace fabric to use as the waist contrast like in the photo. I'm excited to get sewing, but first there are other responsibilities to tend to. Hopefully this weekend can be dedicated to sewing the dressing gown and maybe even the corset that got left in the dust last challenge. I hear there's a possibility of another huge snowstorm, so I'll make sure I get snowed in with my sewing machine this time!

Sunday, February 17, 2013

Smoking Jackets and Dressing Gowns

I've had a busy week! After being snowed in all of last weekend unable to sew I had just a few short days to complete my Valentine's Day plans. A few weeks ago I came up with the idea to sew a classy smoking jacket for my boyfriend. I even found the perfect pattern from Folkwear, Le Smoking Jacket. This project was determined to throw problems my way at every turn however.

The first difficulty was in picking out the fabric. In my head I was envisioning a red and black jacket in a nice brocade fabric. I found the perfect black fabric for the lapels and contrast on the cuffs and pockets, but I couldn't find the right red anywhere. I considered velvet since it was one of the suggested fabrics on the pattern, but it just didn't seem right. Eventually I settled on a very dark red plaid jacquard I had found in the clearance bin. I hadn't liked the fabric at all when I first found it but my boyfriend does wear a lot of plaid so I abandoned my own preferences for something he might like better. The fabric grew on me more and more as the project progressed and in the end I was glad I had bought it, it was the perfect choice.

Way more work than I thought it would be

One big problem with the jacquard fabric was the backside of it. I'm fairly certain it was meant as an upholstery cloth because the back was very scratchy and unpleasant. I solved the problem by flat lining all my pattern pieces with a dark beige flannel to make the jacket nice and cozy. Of course I didn't buy enough of the flannel to line the whole jacket, so I dug through my stash and found a similarly colored linen-look fabric to line the sleeves of the jacket with.

With my fabric all picked out it was finally time to start the sewing. I cut out most of the pattern pieces in the middle of the week planning on starting it on the weekend, and then of course the blizzard came. The pieces sat abandoned in my room until I got back home nearly four days later. It was now Monday night, with Valentine's just three days away and several very long shifts at the cafe standing in my way.

The first night I was only able to sew the pockets on and line the main body pieces. On the second night I constructed most of the main body of the jacket until the directions for the lapels stumped me. I have never used a Folkwear pattern before though I've seen a lot of them since they are my mother's favorite. I found that the patterns tend to assume that you know a bit more about garment construction than you might actually. This was my first time ever making a man's tailored jacket, and there were certain parts about setting sleeves and sewing the lapels and cuffs that I needed more information than the pattern was giving me. With time running short I decided to just finish the lapels and cuffs in a way that made the most sense in my head, and they came out looking fairly accurate.

Another problem I had was that the pattern pieces for the cuffs came up a little short when I sewed them on to the sleeves. They left a little gap where raw fabric edges could be seen, but I had no time to rip the seams out and sew new cuffs, so I came up with a quick fix of my own. I dug up some black bias tape from my stash and covered the raw edges under the cuffs with them, with the added bonus of finishing off the only raw edge I had left in the garment.

The cuff before fixing

And the quick bias tape fix

The pattern called for stitching the corners of the cuff together to keep them in place, but since mine were left with such a wide gap I wasn't able to do so. The corners of the cuffs tend to stand out from the sleeve more than I would like them to, but it's not the worst problem in the world, and the rest of the jacket came out nearly perfect. 

Bias tape ended up being my go-to quick fix for this jacket as I ended up finishing it on Valentine's night itself. I didn't have enough time to properly finish the seams where the sleeves met the jacket, so I just tossed some bias tape over that seam as well to finish it off. I also used bias tape to make the loops for the jacket belt. 

The armhole seam fix, and the two different linings

Finally I finished the jacket with just enough time to get dressed and show up on time. I was a little nervous that he wouldn't be thrilled with the gift, but all worries went away when I saw his face light up with excitement as he unwrapped it. It had come out great, I was pretty impressed for my first attempt at men's tailoring. It fit him pretty well too, since I had to just guess at what size since asking to measure him would probably have ruined the surprise. The sleeves are maybe an inch or two too long, but I got the belt placement nearly perfect.


The Folkwear pattern is for a 1930's styled smoking jacket, and as luck would have it I've been planning a related project for the Embellishment challenge in the Historical Sew Fortnightly. I've had my mind set on making myself a silver screen inspired dressing gown for a while now, and with all the possibilities of flowing ruffles and lace I've decided this challenge is the perfect time.

1920's Dressing Gown

I love the ruffles and layers of sheer fabric on this dressing gown example, but not so much the fur.

1896 Dressing Gown

This dressing gown is from the late 19th Century but I want to draw inspiration from the use of lace since this challenge is all about embellishment. I'm compiling myself a collection of inspiration images and will probably pick and choose certain details that I like while trying to keep an overall 1930's feel to the basic shape of the gown. I still have to make my trip to pick out fabrics and lace, but that will barely be a chore at all, I've been eying a lot of the lace at the fabric store for ages now. The real problem will be trying to restrain myself from buying it all!

Monday, February 11, 2013

Underneath It All

Well, I managed to complete the third challenge of the Historical Sew Fortnightly but not to the level I had wanted to. I wanted to make a corset and chemise, but I was only able to complete the chemise. I've got a good excuse though! As those of you living in North America might have heard, the northeast just got hit by one of the most ridiculously huge blizzards in nearly thirty years, and I live smack dab in the worst of it.

The blizzard was due to start early Friday morning with flurries growing steadily worse until the afternoon when they predicted snow could fall as fast as two to three inches per hour. Of course my boss decided this was not enough of an excuse to cancel work. Luckily my boyfriend lives just a couple blocks away from my place of employment so I decided to weather the storm at his house. The storm was supposed to peter out Saturday morning, so I foolishly thought I could get home Saturday evening and have all of Sunday to sew.

The storm was so bad that the governor actually banned all non-maintenance and emergency traffic from the roads. The wind was shaking the house I was staying at and driving the snow into huge drifts against houses and cars. I believe we got over thirty inches by the time it was all over. Needless to say Saturday came and went with me still snowed in far from my sewing machine. It wasn't until late Sunday afternoon that we were able to dig my car out of the five foot snowbank the plows had left behind it. I wasn't even able to go home on Sunday as there was still a parking ban and I only have street parking at my apartment. This is actually the first night I've been home since last Wednesday!

Thankfully I worked on my chemise last weekend so I at least have something done for the challenge. The pieces for my corset are all cut out and marked just waiting to be sewn, so I'll continue working on in it in my spare moments between other challenges. But enough of my blathering on, let's get to the challenge details!

The new chemise with an old corset

The Challenge: Underneath It All

Fabric: 3 yards of white cotton broadcloth

Pattern: Simplicity 2890

Year: Around 1860

Notions: Lace hem tape and a button

How historically accurate is it? Fairly accurate. I trust that the pattern is for the most part accurate and I even used a button from a line of vintage styled buttons that dates to 1860-1900, but I did sew with a machine instead of by hand and I don't know about the accuracy of the lace trim I used.

Hours to complete: I think this one took about 5 hours

First worn: Hasn't been worn except to take a couple photos

Total cost: About $12

I'm really happy with how this came out. I've never had a proper chemise to wear under my dresses before so it will be very nice to have one at last. And it came out so pretty! I absolutely adore the neckline, and I've had the button I used sitting around in my stash forever. One thing I find a little odd about the pattern is that the sides flare out a bit and make it hang weird around the hips, but of course it'll never really be noticed underneath the rest of the layers. I also placed my button hole wrong the first time since the pattern called for just sewing the button to both layers as decoration and gave no placement markings, so there's an extra bit of stitching that kind of bothers me.

The pretty lace and button, and the bothersome extra buttonhole

I'm looking forward to completing my corset soon since it's an experiment I've had in mind for a while now. I've got another project in the works right now that needs to be done before Thursday and of course some work for Frightful Acts that I've been ignoring so the corset and my next challenge will have to wait for a few days. I've got a busy week of sewing ahead of me, so wish me luck!

Saturday, February 2, 2013

Past Projects: Maleficent

I haven't made much progress sewing this past week. The under-robe for Emperor Palpatine is almost finished and I have my pattern pieces cut out for a chemise, but that's about it. So in lieu of any new material to write about, I bring you a project completed in the past - The Maleficent Dress.


The idea for this costume began when an old professor of mine found out I was working with Frightful Acts as a costumer. She owned a gallery a couple towns over and requested that I think about submitting a costume to her upcoming Halloween show "Things That Go Bump in the Night." The deadline for submission was only a couple weeks away so I needed to not only come up with an idea fast but make it one that would be quick to put together. Eventually the idea to make a more historically accurate version of the villainess Maleficent from Sleeping Beauty came to mind. I had already made a medieval houppelande that would be appropriate for the time period the movie takes place in so I wouldn't need to do much research or draft any new patterns. So with just one short weekend to sew the dress I set to work.

Detail of the fabric used

I found a great faux-alligator skin fabric in the upholstery section that I thought would work well for Maleficent since she becomes a dragon at the end of the movie. It makes the dress fairly heavy and hot to wear but it looks stunning. I also managed to find two perfect shades of purple to match Maleficent's original color pallet. I decided to use the lighter shade of purple for the kirtle to go under the houppelande. 

The fairly basic Kirtle

A darker shade of purple became the lining of the sleeves. I decided that the sleeves should be dagged since Maleficent's original design definitely shows the influence of dagged sleeves. I also wanted to cut the neck with the deep V seen in later houppelande examples so that the kirtle color would show when the dress was on a mannequin. As I looked at more examples of houppelande's I began to realize that dagged sleeves seemed to have dropped out of fashion before the V-neck became popular though. In the end I decided to just go ahead with my plans since this was more of a character costume than a strict historical recreation. 

Detail of the dagged sleeves

A bit of fur trim and a jeweled belt completed the dress, and then it was on to the hat. I was actually able to find an old fashion plate with a hat that had two curled horns just like Maleficent's, but of course I've lost the link. I was going to put a veil on the hat since almost all historical examples had one, but after some advice to keep it more like the character I left it out. The day it was due at the gallery I managed to whip up a stuffed head to support the hat, and the dress looked great!

A view of the train with fur trim

I dropped it off at the gallery feeling pretty good about it. Most of the work submitted was your traditional types of fine art, but there were a few other sculpture submissions, and the owner of the gallery had specifically asked for a costume from me. A couple days later I got an e-mail telling me that the artist curating the show had "decided against having costumes in the exhibit." I was crushed. I had spent hundreds of dollars on cloth and given up a whole weekend at the request of my professor all for nothing. 

As luck would have it though I had used the same color pallet for a costume made for one of Frightful Acts masks. I brought the dress by the studio and the rest of the guys loved it. The dress now has a new home as one of our monsters, and it looks like it was made just for the mask.


All in all I am very pleased with how the dress came out. It's a bit too big for me though and it's hard to wear as a costume at conventions because of the train getting stepped on by the crowd. It looks good in our repertoire for now but ultimately I'd like to find a buyer for the dress who really loves it and would actually get some use out of it.