Monday, January 27, 2014

Pretty Pearls

Ever since reading about The Dreamstress's princess inspired pearl bracelets I've been dreaming of a pair of my own. I've always loved pearls and don't often see them as bracelets. I also haven't ever come up with a good excuse to splurge on some real pearls for myself.

While shopping for supplies for another costume I spied strands of fake pearls on clearance for 97 cents each! I decided on impulse to buy them, and a quick scan of the rest of the bead department turned up two sparkly little clasps for $3 each. I couldn't resist and as soon as I got home I started stringing the pearls. A couple hours later and I had the prettiest little pearl bracelets!


The clasps are magnetic which I'm not thrilled with as they tend to fly off every once in a while, but they hold well enough. Even with the modern clasps they look historical enough in aesthetic that I could probably wear them with several time periods. I don't really have any accessories for my outfits so far so these will probably be seeing a lot of use as I complete more costumes!

Saturday, January 25, 2014

Innovations

I got some good sewing momentum going at the beginning of this month, finishing the first two challenges almost simultaneously. I posted about the re-made petticoat already for the first challenge, but what I didn't mention was that underneath it in the pictures was my completed second challenge! After struggling with ideas for a few weeks my imagination was sparked by a book my mother got me for Christmas that mentioned the crinoline and what an important fashion innovation it was. Since I don't really make costumes from when the original crinoline was popular I decided to go with its descendant/successor more commonly called a bustle nowadays. Thanks to a great tutorial from American Duchess I was able to complete a "Lobster Tail" bustle for my planned 1880's dress with relative ease.


The bustle is made from the same subtly striped white cotton/poly blend that the petticoat is made from. While sorting through and organizing my stash at the beginning of the year I found that I still had a yard or two of this fabric that had been untouched when making the petticoat last year. It was exactly enough to squeeze the bustle pattern on to with enough excess for the two large ruffles at the bottom. The smaller ruffles are strips that had been cut out to make a second ruffle on the original petticoat that I gave up on after struggling forever with the first ruffle. Since it was the very last bit of this fabric I decided I might as well use it up, you can never have too many ruffles! I had already cut out the two large ruffles for the bottom before I found the extra small strips or I probably would have made them all the same size, not that the way it turned out bothers me at all.


Being really excited to get the bustle together and being a little short on funds I sort of improvised on the boning. I had a roll of spiral steel for corsets laying around in the stash and I thought maybe it would work for the bustle. It holds up alright on the lower hoops, but the top one tends to buckle if any pressure is put on it so they will have to be replaced when I get the time to order some proper hoop boning. I'm hoping stiffer bones might give it just a little more 'oomph' in the back. Other than the boning I'm completely pleased with the bustle, and bunny is too.


 The Challenge: #2 Innovations

Fabric: Cotton/poly blend

Pattern: Tutorial from American Duchess

Year: 1880's

Notions: Thread, twill tape for ties, boning

How Historically Accurate is it? Besides the poly content of the fabric I'd say mostly accurate

Hours to Complete: About 3 I think

First Worn: Not yet

Total Cost: All stash items, so $0 for now but new boning is going to cost around $15 I think

Keeping my momentum going is my main goal for now. I've finished the third challenge already and have my fabric and plans for the fourth. I'm really excited to get a lot of these pieces done but am trying to be mindful of the six week guideline for starting projects early. I'm trying to get some things out of the way as soon as I can to leave myself a buffer zone in case something throws me off later in the year. I have a few extra historical pieces outside of the fortnightly challenges that I want to get done as well, and I've just received a commission for a cosplay costume for Anime Boston so keeping on top of things is essential!

Saturday, January 18, 2014

Clowning Around

Every year my Alma Mater holds an Illustration theme show that all illustration students, alumni, and faculty can submit artwork to. This year's theme was Circus, a choice which definitely piqued my interest. I don't really paint or draw much anymore as my interests have focused firmly on costuming which I'm much more talented at but I still wanted to submit something. Inspired by an old black and white photo of a circus around the turn of the century I created a pair of rotund little clowns.


It took an almost all-nighter the day before they were due (my own fault for procrastinating) but I pulled it off! This isn't my first foray into doll making, but it was my first time experimenting with some of these materials. I hand sculpted the faces and feet out of sculpey clay and used gloss varnish and enamel paints to make them look more like porcelain.


The base of their bodies are four inch styrofoam balls which made my last minute rush of finishing them go so smoothly. I realized because of the styrofoam I could pin their clothing on instead of sewing it all together by hand around the ball. The pins are all hidden.


All in all I couldn't be more pleased with how they came out! And I'm very proud of myself for actually submitting to a gallery for the first time in a couple years. As an artist who views the costuming work I make equally important as the paintings I used to make, galleries are a challenge. Most wouldn't view my work as artwork suitable for a gallery setting. I've submitted a costume to a gallery before (at the request of the gallery owner even!) only to have the curator of the exhibit "decide against having costumes in the gallery."

While the clowns aren't really a costume I include them under the branch of "fiber arts" that I've been leaning more toward lately. Usually relegated to the realm of "craft" rather than "art," fiber arts covers a variety of disciplines such as quilting, crocheting, felting, sewing, and basically anything you can make with fabric, thread, or yarn. While some sculpture artists may work with these mediums and be featured in galleries the vast majority are just seen as crafters peddling wares at local fairs and boutiques. A large part of the reason these particular mediums are seen as craft is because they are often utilitarian and usually the domain of women.

I hope in the future to be able to show my costumes and other work in more galleries. I don't want to feel like I have to pull out the dusty old paints and canvas any time I'm invited to submit to a gallery. I'm going to be proud of the medium I have chosen to work with and hope that my small contributions can help redefine the "craft" label that has been slapped over it.

Sunday, January 12, 2014

Make-do and Mend Finish

I'm starting my year off strong with a double entry for the first challenge! Going thorough my rather sparse historical wardrobe I didn't find too many things to mend, and the one thing that did need mending I had to order trim for, meaning I had to wait to fix it. Going through my wardrobe did yield an old petticoat with some potential for improvements though.

The petticoat in question was actually my entry for the second challenge of last year's HSF, UFO. The pieces were cut out nearly a year prior to that. I did not have a lot of experience back then and the petticoat came out rather clumsy. I made it way too large, practically big enough for an 1860's hoop skirt. It was all gathered onto a drawstring leaving it very bulky around the waist. I decided to remake it into something a little more useful for the new wardrobe I'm building.


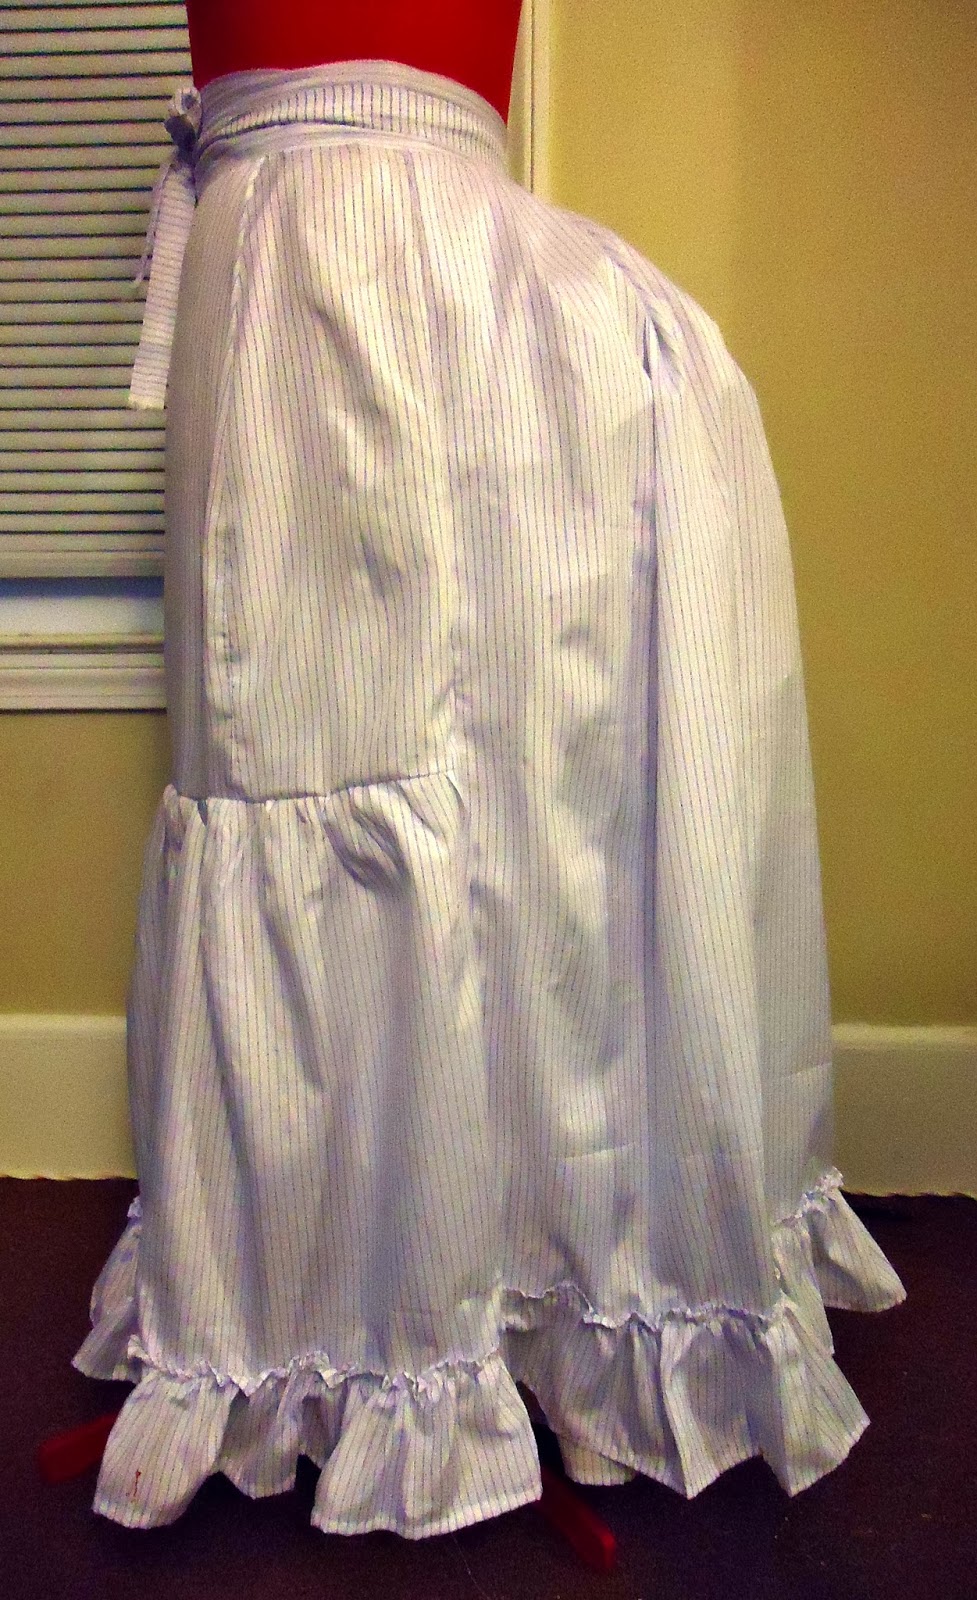
The 1860's petticoat has been updated to an 1880's petticoat! I still love this fabric, and since the old petticoat was just two very large rectangles it was pretty easy to make over. I got my inspiration from the petticoat this woman is wearing in her video. One rectangle of the old petticoat was left just as is for the back. The second rectangle was cut in half so the top could be fitted over the hips and the bottom ruffled to fill out a little more.


I was making up the pattern as I went so it didn't come out quite as smooth over the front and hips as I would have liked, but it's not really a big problem. The back piece is pleated very neatly into a nice smooth waistband. No more bulky drawstring!

Pretty little blue stripes!


I really love how the petticoat came out, and am very pleased with being able to get the correct foundations for my historical costumes made up finally! I could probably even use this petticoat for and Edwardian dress, without the bustle underneath it should have a little bit of a train.


The Challenge: #1 Make-do and Mend

Fabric: Cotton/poly blend

Pattern: None

Year: 1880's

Notions:Thread

How Historically Accurate is it? Besides the poly content of the fabric I'm calling this one mostly accurate

Hours to Complete: About 2

First Worn: Not yet

Total Cost: Nothing!

For the mend part of the challenge I focused on fixing the hemline of an antique skirt. The old wool binding on the hem was threadbare and worn. There was also a fairly large tear near the hem. The pleats hid all of the damage cosmetically but since I want to make this skirt part of my wardrobe I wanted to strengthen the hem to prevent further wear and tear.


I added a small linen patch to the largest hole in the hemline. This whole section of the hem had a lot of wear to the actual fabric itself so I bound it with a wider wool tape to protect the weakened fabric. The rest of the hemline only had damage to the wool tape used to bind it so I just patched new tape of the same width over the worst spots.


The Challenge: #1 Make-do and Mend

Fabric: Linen cloth and two types of wool tape

Pattern: None

Year: 1880's I think

Notions: Cotton thread

How Historically Accurate is it? Fairly accurate, I tried to match the original as closely as I could

Hours to Complete: 4

First Worn: Not yet

Total Cost: $18 for the wool, the rest was stash

All in all I'm excited for a strong start to the new year. I've already completed the second challenge as well, a post will be coming soon about that! I've got plans in the works to knock out almost all of the various bits of underwear I'll need for Victorian and Edwardian costumes within the first four or five challenges. Once my foundations are all made up I can focus on the gorgeous gowns to go over them!

Friday, January 3, 2014

Sewing Bunny

I know I've heard of a sewing cat many time before, but how about a sewing rabbit?

.

This is Sgt. Pepper, the cutest little nuisance in the world. Every time I lay out fabric to cut, she runs on over and plops herself down in the middle. I know she thinks it's play time when we sit on the floor, but that doesn't explain why she goes straight for the fabric. Or why she won't leave the fabric. I've been nipped at trying to shoo her away!

Perfect place for a nap

Incidentally the fabric little miss Pepper was trying to prevent me from cutting up is the start of HSF '14 challenge #2! I'm pretty proud of myself, planning this far ahead. I have a few little bits and bobs to do for the make do and mend challenge, but I'm more excited about the second challenge. I've decided to get the bustle for my planned Victorian dress out of the way.

When the challenge was announced I had a hard time coming up with an idea for it, bouncing around from one to another for a while. Then, for Christmas my mother got me a Victorian fashion book and in the first few chapters it spoke of the Crinoline and how it was one of the greatest fashion innovations of the time period.

I plan on making a "lobster tail" bustle using this tutorial from American Duchess. I know that a lobster tail bustle isn't really a crinoline, but it is a descendent of the first crinoline style. One could probably call it an innovation of it's own right, a re-styling of the old crinoline to match the fashionable silhouette of the era.

The fabric is an old cotton/poly blend that's been sitting in the stash for a while. Half of it got made into a petticoat at the beginning of last year's HSF, so it seems rather fitting that the other half get used up to kick off this year. And Pepper seems to approve of it!

Wednesday, January 1, 2014

Make Do and Mend

This year I am going to try my very hardest to finish the HSF'14 challenges ahead of time. Last year I would spend the first week of the challenge period waffling back and forth on what to do. I'd come up with a big elaborate project and then panic when I realized there was only a week left. Then I would have to come up with a new, simpler plan and by the time I had fabric and patterns and research done all that was left was a weekend to sew. Last year I pretty much depended on the weekend before the due date to get my project done since it was usually due on Monday. This year with the reorganizing of the due dates I no longer have that weekend buffer so I have to plan further ahead.

So with all of that explanation out of the way, I have my very first challenge project to introduce. About six months ago I found a gorgeous historic Victorian skirt at a vintage clothing store in my home town. The owner had been renting it out for events and was reluctant to part with it, and now that I think back on it I probably paid more than I should have for the shape it was in. It's still completely wearable though, most of the damage is just superficial.

Front

Back

I was confused at first about the unusual design with the brown top and black bottom, but I think I came up with a possible answer. If the owner was of lower class the brown fabric might have been used as a base to save on the probably more expensive black fabric. The brown base is a full skirt and the black fabric is attached on top. There was probably an overskirt or bustle that covered up the brown. The bottom decoration is gorgeous but simple, a few rows of pleating followed by two rows of flat pleats. The lack of fancier trims and a long train also lead me to believe a working class woman owned this.

Detail of the ruching

I'm not quite sure on the exact dating of this skirt. It seems to have a mixture of hand sewing and machine sewing, but that doesn't help too much since home sewing machines started being introduced in the 1860's. My best guess is that it's sometime between the 1880's and the turn of the century.

Hand stitching where the black attaches to the base

Machine stitching where the bottom ruffle attaches, the top ruffle hides this

Hand stitching on the backside of the ruching detail

This skirt is already a make-do skirt, and it definitely needs some mending. Since it was used as a rental costume it has a lot of wear and tear. The owner of the clothing store has already done a few repairs to it, but they're quick and dirty fixes in a thread that doesn't even match.

Pretty little button hole stitches

Someone seems to have ripped the button hole on the dress (a shame, look at those stitches!) and then repaired it hastily with blue thread. The mess of black thread on the top there is because they attached a hook and eye to the opening to help the weakened button hole hold. I'll probably remove the hook and eye and repair the button hole itself to be stronger.

The added hook and eye

These snaps were definitely added later

A tear also repaired with blue thread

The bottom hem of the skirt is also a raggedy mess with the original binding practically disintegrating. I will definitely be removing and replacing the bottom binding.

Ragged bottom edge

Unfortunately someone also appears to have dripped bleach onto the skirt at some point in time. I don't know how or if I could repair that. I'd be a little afraid of trying to dye the spots back, and the bleach will ultimately eat away at the fabric. It's just a few spots so I can live with it if it can't be repaired.

The worst bleach spot

More bleach damage

There are also lots of little holes, probably moth damage. I don't know if it's worth darning them all or if I should just leave them be.

Lots of little holes

One of my favorite parts of the skirt has to be the fact that it has a pocket! I always forget to put pockets in my dresses. No one really talks much about pockets when they're designing a new dress, but they are absolutely vital.

Pocket!

Now that I've thoroughly documented the skirt and all the repairs it needs, I turn to the historical community for help. There are a few repairs I know how to do on the skirt, but this is the first historical piece I've owned and I want to know the best way to preserve it. Any and all advice is welcome!