Showing posts with label Character Costumes. Show all posts

Sunday, March 23, 2014

Anime Boston Commission

I've alluded to a commission I've been working on in a couple previous posts but I haven't gotten around to even introducing it yet! I was asked to make a costume for the Anime Boston convention of a character from Final Fantasy XIV. I've never played the Final Fantasy game series so I don't know much about the characters at all, but I was provided with a very detailed sketch of the character called a Bard Relic.

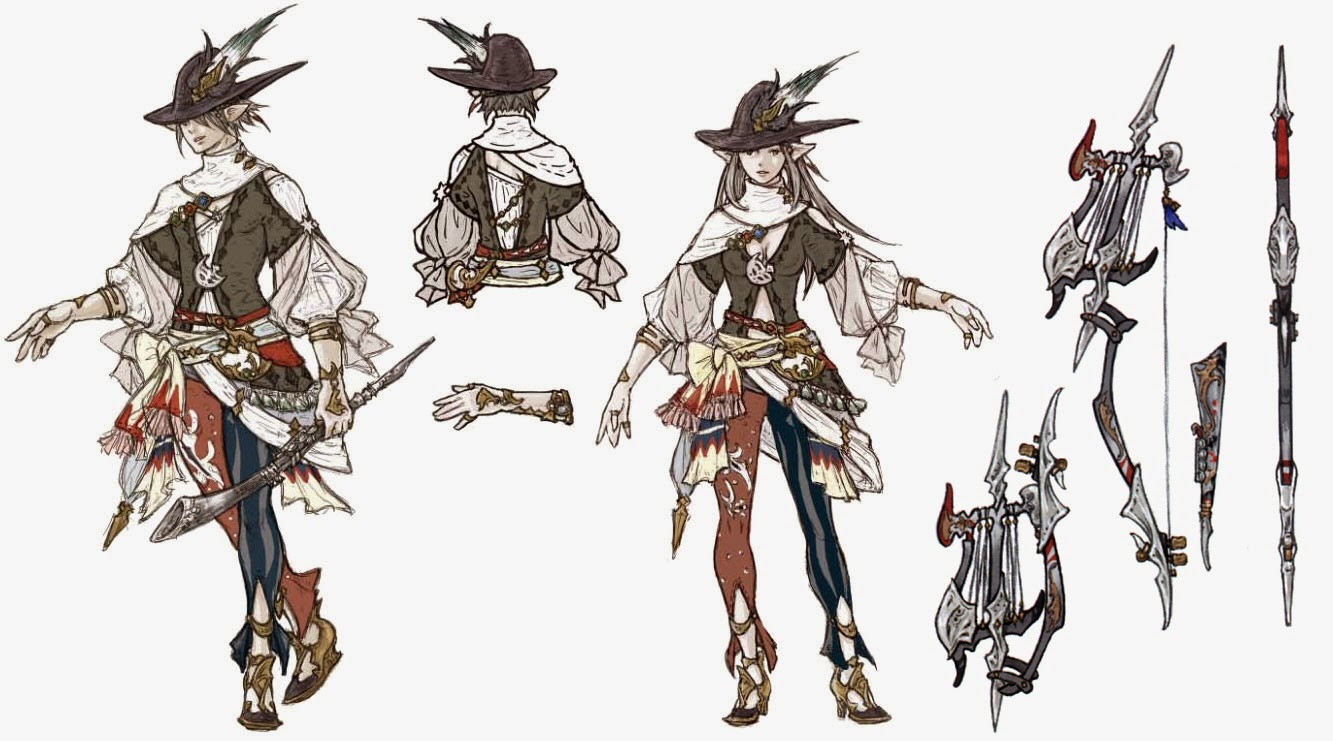
Concept art for the character

It looked rather complicated at first but I was able to pick it apart into smaller pieces and lots of layers. It still took me about twice as long as I expected to sew, but that is always the case. I'm absolutely horrendous at estimating how much time a certain project is going to take. I started out with some of the simpler layers and made good progress at first, but it was the smaller details that bogged me down.


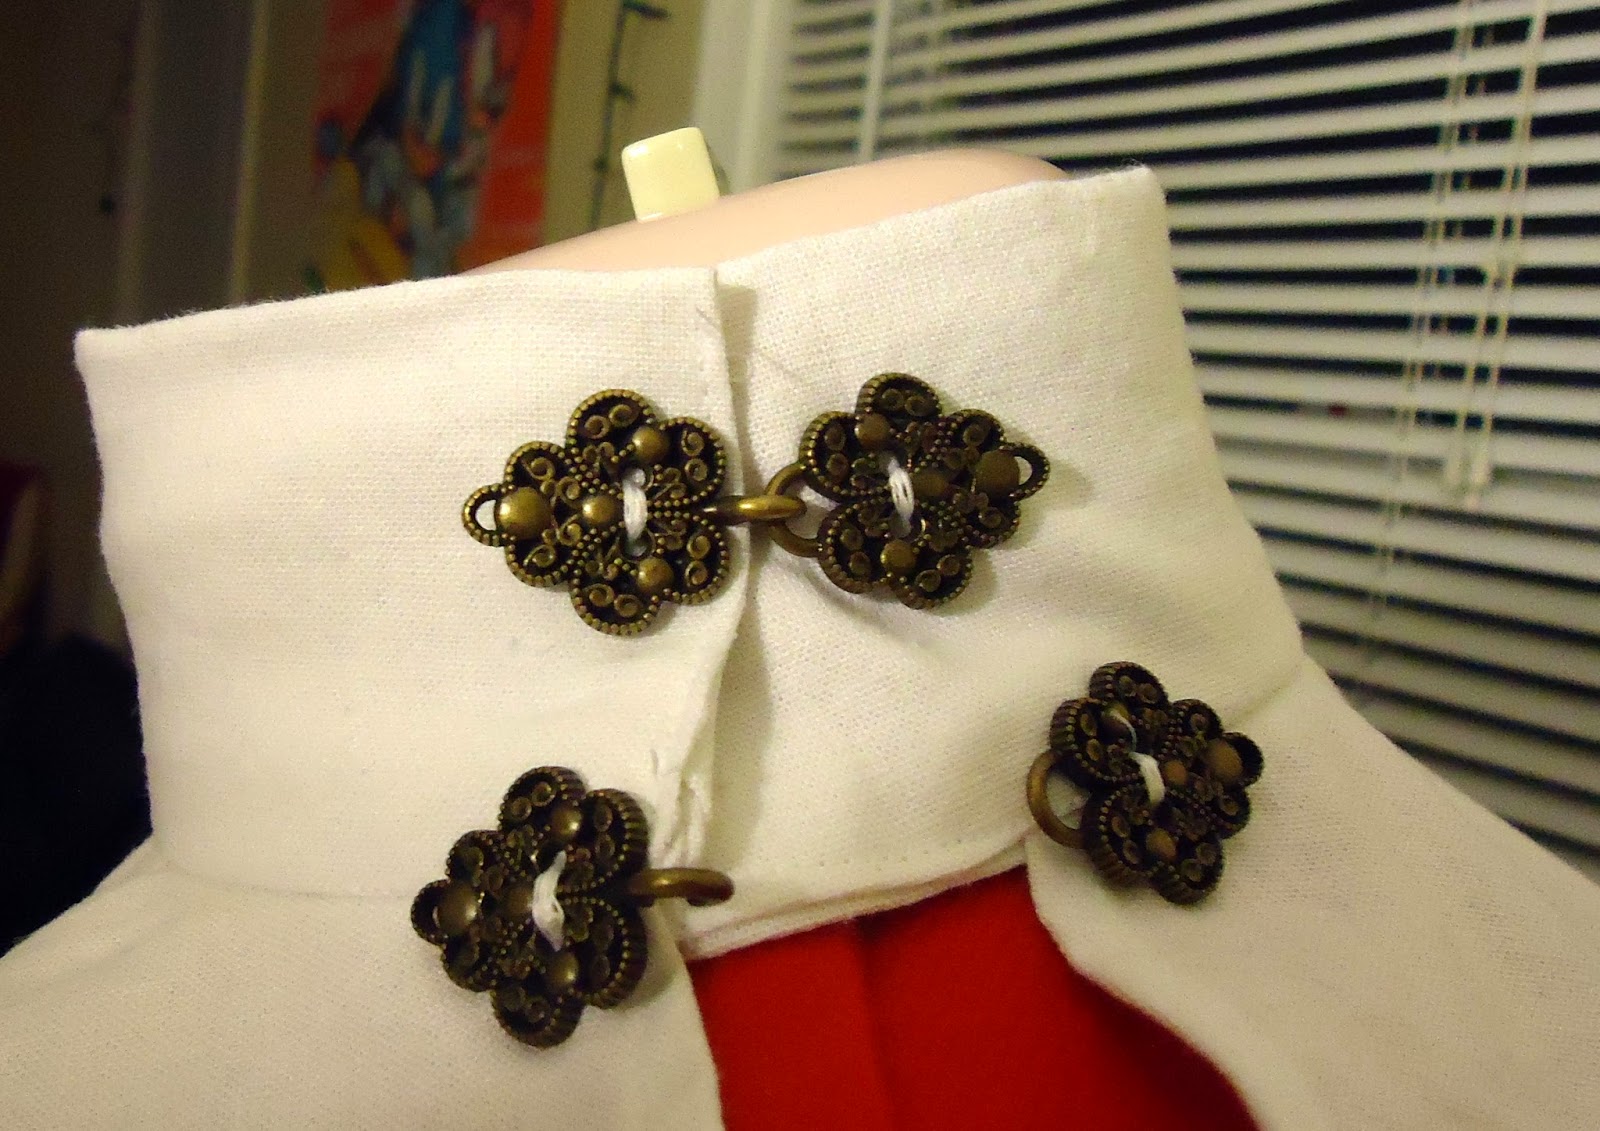
I made the little capelet out of some heavy white linen. The little brooch is sculpey and rhinestones, and there's a couple really pretty clasps on the side opening.


My mannequin has a fat neck, but you get the idea. The hat was a little more complicated to make and was my first foray into haberdashery. I started with some felt and stretched it over a makeshift hat block to get the crown. The brim is sewn to the crown with a piece of wire running through the seam, and another piece of wire at the edge of the brim to keep the unusual shape it has. Some feathers complete the look.


The pants were a fairly straightforward piece as well. They're made out of stretch jersey to be a little more form-fitting. I used cut up lace and some bridal appliques to recreate the floral design on the red side. The striped blue fabric I was lucky enough to source a fairly good match for online.


The main bodice was the most difficult and time consuming of the pieces. It's open in the back and just barely closes in the front making it very difficult to fit. It has layered, poofy sleeves and lots of tiny little diamond trim detail. The sleeves were so heavy I had to add a piece of elastic to the top of the shoulders to keep them from getting pulled down. I couldn't find an appropriate trim, and trying to sew dozens of little grey diamonds would probably result in my own demise so I settled for painting the detail on.


The brooch is made out of sculpey again, and there's a couple more in the shapes of stars on the sleeves. The sashes also got the paint treatment.


There's a small white wrap-around half skirt with little gold bead details that I completely forgot to take separate pictures of. There's also a small red bag that goes around the waist.


Put all together at last I think it came out very successfully! This is definitely one of the more complicated cosplays I have done, second only to Darth Maul in my opinion. It was a nice challenge of my sewing skills and my resourcefulness in translating drawings into wearable clothing. That being said, I'm glad it's over and done with and I can get back to my historical comfort zone!

Sunday, May 19, 2013

Ophelia

The Ophelia dress is completed and I am so happy with how it came out! This is one of the first dresses I've made that went together with no fuss at all. It was a very simple cut, so with the practice I've been getting sewing so often lately it was about time I finally got things right. I didn't have to rip out a single stitch! Best of all I finished with enough time to take a proper photo shoot.


Challenge: Literature

Fabric: 5 yards of cotton sateen

Pattern: None, based mostly off of a photo of Mignon Nevada as Ophelia in 1910

Year: Late 19th to early 20th century

Notions: Thread

How historically accurate is it? This one is more historically plausible as it was made to be a period theater costume

Hours to Complete: 4

First Worn: For a photo shoot just this morning

Total Cost: $25 in fabric, $17 in flowers for the photo shoot


The idea behind this dress was to create a costume for Ophelia as if I were a costume maker working for a theatrical production of Hamlet in the late 19th to early 20th century. I pulled inspiration from paintings of Ophelia from the time period and from a photograph of soprano Mignon Nevada as Ophelia in an operatic production of Hamlet in 1910.


 I also used my past experience in making a few medieval kirtles and houppelandes to draft the basic shape of the gown. In fact the only thing that differs from my houppelande pattern is the width and length of the skirt and train and the sleeves. In that way I could keep an accurate medieval silhouette but add a little modern twist to it. 


I had a very short amount of time in which to complete this costume - only one day in fact. I am so lucky this project didn't give me a hard time, it went together even faster than I had ever imagined. The fabric was a dream to work with too, I've never chosen a cotton sateen to work with. I chose it this time because of the recent post The Dreamstress made on historical accuracy


I had originally thought to make the dress out of linen. It is historically accurate for both the medieval period and for the Victorian/Edwardian production. Also, many theater productions wouldn't always have a big budget, and linen was an inexpensive cloth at the time. I have to admit, I just don't think I like linen all that much. Maybe it's just the fabric at my local chain of stores, but I always find it stiffer than I'd like and no matter how thick the weave is it is always see through in white. 


This time when I went to the fabric store I focused a lot more on the weight and drape of the fabric. The cotton sateen stood out for several reasons. First of all it drapes and falls gorgeously. The next most important thing was that it was far more opaque than most white fabric you find. Also it was just ever so slightly off-white which goes so much better with my complexion than a stark white would. The price wasn't too bad either, and I had a 50% off coupon for it!


I had originally planned for a small side opening in the dress with hook and eye closures. I decided on this type of closure because theater costumes often require quick changes and a side opening is much smaller and easier to get at than a back closure. I would have liked to make a laced kirtle style dress, but that was impractical for both my time limit and for a theater quick-change. 


In the end I didn't need the side closure at all. The cotton sateen was also 3% spandex, giving it enough stretch to slip on right over my head. This was probably one of the biggest factors in how quickly I was able to complete the dress, and I'm way happier with the smooth finish it leaves to the whole garment. 


I decided that I was not going to wear any corsetry under the dress. Part of that decision was because of the pre-raphaelite influence I was using for this dress. Many of the pre-raphaelites rejected the ideals of the current restrictive fashion of women's clothing. They romanticized a more medieval silhouette and style of dress and freedom from corsets. I wore just my 1860's chemise for a little more modesty.


After the dress was finished it was on to the photography! One of my good friends came down for a visit and to help me shoot the dress. I whipped up a quick headband with flowers braided into it, grabbed a bouquet and headed to the beach. 


There is a gorgeous park just a short distance from my house that has some lovely gardens as well as a great beach. We decided it would be one of the best settings for the photoshoot. 


It was crazy windy at the beach, and the sun went away as soon as we got there, but the pictures still came out great. The wind really helped to show off the movement of the dress. I fall more in love with the fabric each moment!


Thursday, May 16, 2013

Planning for Madness

I've finally figured out a quick and easy project for the Literature challenge that I'm really excited to do. I'm going to tackle my namesake, Ophelia, from Shakespeare's Hamlet. This is the perfect project for me because I have a long background in and great passion for theater costuming.

I plan on approaching this project in a sort of odd way, at least compared to how I predict everyone else is interpreting this challenge. Hamlet is set in an intentionally vague medieval time period and plays are so often set in whatever period the director feels best suits their production so I am not going to waste my time trying to pin down a specific time period for the clothing Ophelia would be wearing. Instead I am going to approach Ophelia's costume as if I were a costume designer for the theater in the mid- to late-nineteenth century. I've specifically chosen my time period because that is when the Pre-Raphaelites had a large influence on the artistic community and Ophelia was a favorite subject of many Pre-Raphaelite painters.

Ophelia by Henrietta Rae, 1890

I've chose two images to base my own costume off of. Both have influence of medieval dress and I plan to use my old kirtle pattern for the base of the costume. The first image is a painting from my time period (though not by a pre-raphaelite unfortunately, their paintings included clothing too richly decorated for my time restraints). The second is an image of an actress as Ophelia in 1910.

Mignon Nevada as Ophelia circa 1910
I plan to make a mostly plain white dress as white clothing, disheveled hair worn loose, and wildflowers were early theatrical shorthand for female madness. I have just one short day to make this costume as I want to photograph it in a setting this time instead of just on my mannequin in the dining room. Hopefully everything will go according to plans!

Sunday, April 21, 2013

Serendipity

Earlier this week I posted about two Harley Quinn costumes in lieu of any real sewing progress. I'm happy to report I finally got back to my sewing machine but not for the project I'm supposed to be working on unfortunately.

I live just outside of Boston so needless to say this past week has been one of the more frightening and stressful weeks of my life. Amidst all the worry and fear the very best of our community came out however. The Boston Comic Con was supposed to take place this weekend but was understandably cancelled Friday evening. Many of my friends had been planning to go and were very disappointed. That is when the artistic community in my area sprang into action.

Just a few short hours after they announced that the convention was cancelled plans were already underway for our own home town version. Local artists were contacted, a gallery space was donated and invites were sent out in droves. In less than twenty-four hours we pulled together an amazing group of people for the Beverly Comic Con.

I found out about the event through friends and facebook late Friday night. Having just posted about the Harley Quinn costume it was fresh in my mind and this would be the prefect excuse to fix it up and show it off again. Saturday morning I got straight to work with a 4 pm deadline for the start of the event. 

The bolero top was my main focus for fixing up. I was in a rush the first time and when the sleeves didn't fit quite right I made a quick and dirty fix for them. It looked alright, but it wasn't what I wanted the sleeve to look like at all. Luckily I had an extra yard or so of fabric to make a new set of sleeves out of. The corset also needed a couple repairs where bones had ripped out of their casing because of some inferior twill tape. I worked right down until the last second but was so happy with the results!


Since I was replacing the sleeves anyway I took the opportunity to add another color switch to the pattern. The sleeves had been a solid color from top to bottom last time, but I think they look much nicer now. 


Another change I made to the bolero was in the neckline. It was cut kind of high before and instead of staying up around my neck like it was supposed to it just flopped downward sadly, so I cut it down into more of a V-neck. That left the original lace trim a little short. I had an extra piece of it, but it was also short and I didn't want a visible break in the trim. 


My solution was pretty simple, but I love the look of it. I cut the extra trim I had in half and pleated it onto each center front of the neckline. I was able to tuck the ends of each piece of the trim underneath so that it looks more like one flawless piece and the pleating adds a bit more interest to the neckline.


I'm really happy that I got a chance to properly photograph the costume as well, and the people at the convention were so happy to have a cosplayer there! Overall the event was amazing. To see people come together to pull off something so amazing is really awe-inspiring. I only regret that I forgot to take pictures at the convention!!

As for the Historical Sew Weekly Challenge I was supposed to be working on, it's pretty obvious that I will be missing the deadline for this one. I might see what progress I can make tonight and tomorrow, but I don't even really have fabric yet. Maybe I'll complete it another time. Hopefully I will get myself back on track for the next challenge though.

Sunday, April 14, 2013

Past Projects: Harley Quinn Times Two

I'm still getting over whatever sickness struck me down this past week, so sewing progress has been pretty much non-existent. So instead of a new project I bring you another entry to the series of past projects; Harley Quinn done two ways! For those of you not as nerd-savvy, Harley Quinn is a Batman villain most often seen as the Joker's lead lady. Her name of course is a play on harlequin as is her costume.

Harley's original costume

As it is with most comic book characters, her costume has been re-imagined many times for different series and different medias. Last year in the fall I had a video-game themed costume party to attend and was having a hard time coming up with a costume. A lot of video game ladies have costumes that show off a bit more skin than I'm frankly comfortable with, and the other choices like Princess Peach didn't really resonate with me either. I was already planning my own interpretation of Harley for a halloween party a month or so later, so I looked up what Harley's costumes looked like in the newer Batman games Arkham Asylum and Arkham City. The Arkham Asylum costume was just awful and not something I wanted to wear, but the Arkham City costume had great potential. It was sexy and just a little revealing without being ridiculously over the top.

Harley in Batman: Arkham City

Of course by the time I had finally settled on what costume to make I had precious little time left before the party. I whipped up a red corset using one of my victorian patterns cut down to be an under-bust corset. If I ever have a little extra time I would like to go back and make one with the straps that Harley's has, but the one I made was passable. Most of the costume was pretty easy, I had an old pair of black skinny jeans hanging around that got one leg painted red, and a pair of knee high boots got the same treatment. The first tank top I made for the party was made from a red and a black tank top I had laying around, cut in half and sewn back together. The red of the tank top didn't match though, so I made a new one for the next use of the costume.

Completed Arkham City costume

Shortly after the video game party I went to a convention with Frightful Acts. One of my co-workers is a huge superhero fan and has several of his own Batman and Superman costumes, so I brought along the Harley costume as well. It was impressive enough that I got interviewed by the Boston Phoenix for a small online article about costumes at the convention!

After the convention was over I had just one or two very short weeks to complete my plans for Halloween. I had decided months before I even thought of the video game Harley Quinn costume that I wanted to make a more Victorian inspired version of Harley. I had been thinking I could use the same corset as the first costume, but I really wanted to do a full party-colored outfit. I tried out a new corset pattern for the second costume that ended up really flattering the look well.

My own version of Harley

The bolero top has a few issues, but the corset and skirt came out perfect. There were even a few girls drooling over this costume at the next convention I went to! Unfortunately I didn't get to do a proper photoshoot with either of these costumes, but at least there's a little photographic evidence.


 Hopefully my next update will be progress on the victorian bathing costume I'm planning. I've got the pattern and should get a chance to buy the cloth tonight.

Saturday, February 2, 2013

Past Projects: Maleficent

I haven't made much progress sewing this past week. The under-robe for Emperor Palpatine is almost finished and I have my pattern pieces cut out for a chemise, but that's about it. So in lieu of any new material to write about, I bring you a project completed in the past - The Maleficent Dress.


The idea for this costume began when an old professor of mine found out I was working with Frightful Acts as a costumer. She owned a gallery a couple towns over and requested that I think about submitting a costume to her upcoming Halloween show "Things That Go Bump in the Night." The deadline for submission was only a couple weeks away so I needed to not only come up with an idea fast but make it one that would be quick to put together. Eventually the idea to make a more historically accurate version of the villainess Maleficent from Sleeping Beauty came to mind. I had already made a medieval houppelande that would be appropriate for the time period the movie takes place in so I wouldn't need to do much research or draft any new patterns. So with just one short weekend to sew the dress I set to work.

Detail of the fabric used

I found a great faux-alligator skin fabric in the upholstery section that I thought would work well for Maleficent since she becomes a dragon at the end of the movie. It makes the dress fairly heavy and hot to wear but it looks stunning. I also managed to find two perfect shades of purple to match Maleficent's original color pallet. I decided to use the lighter shade of purple for the kirtle to go under the houppelande. 

The fairly basic Kirtle

A darker shade of purple became the lining of the sleeves. I decided that the sleeves should be dagged since Maleficent's original design definitely shows the influence of dagged sleeves. I also wanted to cut the neck with the deep V seen in later houppelande examples so that the kirtle color would show when the dress was on a mannequin. As I looked at more examples of houppelande's I began to realize that dagged sleeves seemed to have dropped out of fashion before the V-neck became popular though. In the end I decided to just go ahead with my plans since this was more of a character costume than a strict historical recreation. 

Detail of the dagged sleeves

A bit of fur trim and a jeweled belt completed the dress, and then it was on to the hat. I was actually able to find an old fashion plate with a hat that had two curled horns just like Maleficent's, but of course I've lost the link. I was going to put a veil on the hat since almost all historical examples had one, but after some advice to keep it more like the character I left it out. The day it was due at the gallery I managed to whip up a stuffed head to support the hat, and the dress looked great!

A view of the train with fur trim

I dropped it off at the gallery feeling pretty good about it. Most of the work submitted was your traditional types of fine art, but there were a few other sculpture submissions, and the owner of the gallery had specifically asked for a costume from me. A couple days later I got an e-mail telling me that the artist curating the show had "decided against having costumes in the exhibit." I was crushed. I had spent hundreds of dollars on cloth and given up a whole weekend at the request of my professor all for nothing. 

As luck would have it though I had used the same color pallet for a costume made for one of Frightful Acts masks. I brought the dress by the studio and the rest of the guys loved it. The dress now has a new home as one of our monsters, and it looks like it was made just for the mask.


All in all I am very pleased with how the dress came out. It's a bit too big for me though and it's hard to wear as a costume at conventions because of the train getting stepped on by the crowd. It looks good in our repertoire for now but ultimately I'd like to find a buyer for the dress who really loves it and would actually get some use out of it. 

Thursday, January 17, 2013

A Foray Into the Dark Side

I've briefly mentioned my second job as costumer for Frightful Acts before. Frightful Acts is a small high-end  silicone mask company made up of a very few dedicated people. We were recently commissioned to make a Darth Maul mask by a devoted Star Wars fan, and when someone saw our progress updates on Facebook they commissioned an Emperor Palpatine mask as well. Since we're making the masks we figured we might as well go all the way and make the costumes as well.

I decided to start with Emperor Palpatine because frankly his costume is a lot easier. There are just two basic pieces to it, a cloak and under-cloak, both of which are fairly straightforward. Darth Maul on the other hand has half a dozen very specific layers and a cloak of tiny little sunray pleats that I'm dreading having to make. Tonight I finished the Emperor's cloak.


The original movie cloak was made out of waffle weave fabric dyed black (or so I heard while researching my own cloak) since it's almost impossible to find waffle weave fabric in black, as I quickly found out. I did however find a black plisse fabric that looks very similar to waffle weave. It had glossy stripes on the good side which wouldn't work for the costume so I just used the backside of it. The cloak itself is fairly simple, the only really defining characteristics are the fabric choice and the shirring at the sleeves. I had a fairly easy time making the cloak actually. We'll just have to wait and see how the rest of the Star Wars costumes go though.