Friday, December 27, 2013

A Princess Dress for the Little Princess

My entry for HSF challenge #26 is definitely not a strict historical dress, but it's historically-inspired. My niece has been asking for a pink princess dress with long, puffy sleeves ever since I made her a Merida dress a year or two ago. She's long since outgrown the Merida dress, so Christmas was the perfect excuse to get my butt in gear working on the new dress.


Between the type of sleeves my niece wanted, a huge shortage of time and some very, very vague measurements I knew that a strict historical dress was out of the question. I decided to go with a pretty common fantasy medieval type style of dress. It's got elements of a 17th century french dress with the faux robe-over-petticoat look I gave to the front. The sleeves I'm not really sure belong to any real type of historical dress but are reminisent of the long medieval sleeves of a houppelande or such. The lacing is mostly there to help with the sizing if needed and to add a little extra detail.


Anyway the Peanut ended up loving the dress. She'll definitely get a bit more wear out of this one since there's plenty of room to grow. Still I feel a little silly entering this into the HSF but I have nothing else for the challenge and no time to make anything else, so historically-inspired it is!

The Challenge: #26 Celebrate!

Fabric: Cotton

Pattern: None

Year: None

Notions: 2 yrds lace, 2 yrds gold/purple trim, 2 yrds ribbon, eyelets

How Historically Accurate is it? Not at all

Hours to Complete: Between 3 and 4

First Worn: Christmas

Total Cost: Somewhere between $15 - $20

Monday, December 16, 2013

One Meter

Getting back on track for the Historical Sew Fortnightly! My first challenge completed on time (or at all) since wayyy back in June. I'm hoping jumping back in now will make a nice smooth transition into HSF '14. A fairly straightforward entry for the one meter challenge, I made my roommate her very first corset!


The Challenge: #25 One Meter

Fabric: Cotton Twill

Pattern: Truly Victorian 110, modified to be an underbust

Year: 1880's

Notions: 2 yrds bias tape, 22 spring steel bones, busk, 26 eyelets, 5 yrds lacing

How Historically Accurate is it? Very! The pattern is definitely accurate. It's machine sewn but that's not completely out of the realm of possibility for the 1880's.

Hours to Complete: Between 3 and 4

First Worn: To a holiday party this past weekend.

Total Cost: $12 for fabric, $11 for bones, $6 for laces and bias tape, salvaged the busk from an old corset and the eyelets came from the stash so $30 all together.


She's absolutely thrilled with the corset, and it's a pretty good fit for my first try at corseting for someone other than myself. The only issue is that it might be too big for her soon! She's planning on waist training and I was able to lace it down to a 2 inch gap the very first try. I didn't expect her to reduce 4 inches the first time! the shape of the corset is great on her too, I'm thinking of making myself an underbust from the Truly Victorian pattern too!

Saturday, December 7, 2013

Planning

I'm super excited that the Historical Sew Fortnightly is continuing into the new year. Having made it just barely halfway through the first year I'm thirsty for another shot at beating the challenge. Last year I found out about the challenge after it had already started and I jumped in with barely a second glance. This year I need a plan.

In the challenges I completed at the beginning of this year I feel like I made several pieces I was very proud of, but I didn't manage to make a full ensemble. My costume collection is fragmented and incomplete. This year I plan to flesh out the holes in my collection and end up with a full wearable wardrobe. In order to do this I want to lay out what I need ahead of time and find ways to fit them into the challenges.

Goal #1: Victorian Bustle Dress

Pieces I have:
Corset
Chemise

Pieces I need:
Petticoat
Drawers
Skirt/Overskirt
Bodice

Goal #2: Edwardian Ensemble

Pieces I have:

Skirt (an actual historical piece!)
Blousewaist (doesn't really match the skirt)

Pieces I need:

Corset
Chemise
Corset cover
Drawers
Either a skirt or blouse to match the one I have


There are already a few challenges I can fit these goals into. I really don't care too much for the color pink, at least not enough to make a full dress out of it, but some pink undergarments wouldn't bother me since I need a lot of underwear. There's also an underneath it all challenge again to help knock out the underpinnings. I believe there was a bodice challenge, so that takes care of part of the Victorian dress.

The goals above are costumes that I would get the most use of and therefore want to prioritize. The Victorian and Edwardian eras are some of my favorites and I would have the most opportunity to wear these dresses whether at conventions and events or just for fun around town.

There are other dresses and eras I really admire but don't know as much about. I don't know if I'd have any opportunities or uses for these dresses besides a one time photoshoot, but they would still be fun to make. These dresses are on my wishlist, a list I can pull from when I can't fit anything from my main goals into a challenge.

Wishlist Dress #1: Robe a la Francaise


Pieces I need:

Chemise
Corset (stays?)
Panniers
Petticoat
Robe

Wishlist Dress #2: Regency dress

Pieces I need
Chemise
Corset (corselet?)
Dress

These pieces I don't know as much about so some more research might be needed to complete my lists. Needless to say I would need all the underpinnings for these dresses, I just don't know all the terms and pieces off the top of my head. I may add to the list later, but for now this should be plenty of pieces to keep me busy for the whole year!

I'm Back!

Well, I certainly didn't mean to disappear like that, but life has a way of disrupting plans. A busy summer of commissions and a dead computer made it almost impossible to keep up with the blog or the historical sewing challenges. I've finally managed to replace the computer so I have the internet once again! How I missed you old friend. I'm not showing up empty handed either, I've got a new Historical Fortnightly Challenge entry, albeit a week late.


The Challenge: # 24 Re-do

Challenge I'm re-do-ing : #13 Lace and Lacing, #14 Eastern Influence, #19 Wood, Metal, Bone

Fabric: 1 yard of what I'm pretty sure is linen that my Uncle brought me from Japan and a yard of twill for lining

Pattern: Truly Victorian 110

Year: 1880's

Notions: 24 steel bones, busk, 26 eyelets, lacing, bias tape, thread

How Historically Accurate is it? The fabric might not be 100% but the pattern is accurate, so pretty close.

Hours to Complete:  Maybe 6 or 7

First Worn: Last Thursday

Total Cost: The fabric was a gift, the busk was salvaged from an old corset and the eyelets came from the stash so I maybe spent $20 on bones, lacing, and the fabric for the bias tape.


The fabric kind of wrinkled up on me as I was sewing the boning channels, It's a little stretchier than I thought it would be. Flat lining it with something stronger might have helped, but I was excited to try out this new pattern. I'm intending to start waist training soon so I'm looking for a comfortable corset pattern. This one I don't think is strong enough for everyday wear, but it will be a nice display piece.


Monday, June 10, 2013

Catching Up

I have been incredibly lax in my blogging these past weeks! It's been a whirlwind. On top of moving apartments I received two costume commissions from my job at Frightful Acts. I'm very excited because these are some of my first real sales of my work! In between moving and commissions I did manage to complete the latest Historical Sew Fortnightly challenge, albeit a week late.

For the Squares, Rectangles, and Triangles challenge I chose to make a haori. A haori is a short coat worn over a kimono and they can range from everyday wear to very formal wear. I found some gorgeous mauve and gold gingko leaf patterned fabric on clearance a few months ago and bought it all up. It was an upholstery cloth so it's a little thicker and heavier than is proper for a historical haori, but I thought it would make a nice fall coat. Fall came and went, and then so did winter and spring. The challenge gave me the perfect excuse to finally get around to the haori, just in time for the weather to get too warm to need a jacket.  Oh well, it will be fall again soon enough.


The Challenge: Squares, Rectangles and Triangles

Fabric: 3-ish yards of mystery upholstery cloth and 2 yards of cotton for the lining

Pattern: Folkwear #129 Japanese Hapi and Haori

Year: Traditional Japanese clothing hasn't really changed much in the past few centuries, so its hard to place it in a certain year

Notions: Cording for the ties I haven't sewn on yet (oops)

How Historically Accurate is it? Admittedly not very. The fabric pattern looks about right, but it's woven in instead of silkscreened like I think most Japanese cloth was, and the weight and material is all wrong. It's all just cosmetically historical.

Hours to Complete: I lost track completely but I think it's pushing 10 hours

First Worn: I've been wearing it around the house since yesterday, it's very comfy!

Total Cost: Estimating about $45


Part of the reason this challenge took me so long is that there was a lot more hand sewing involved with this pattern than I had thought. I am not a hand sewer. It takes me forever and my stitches are always so crooked. Admittedly if I just practiced more it wouldn't be so bad, so I bit the bullet and hand sewed all the bits called for in this pattern. I'm actually pretty proud of how it came out, I managed to make my stitches almost invisible where the facings were sewn down to the linings!

My best hand stitching yet!
I would really like to make this pattern again in a proper weight of cloth, something a little more silky and drape-y. The cloth I chose is beautiful, but it is bulky and will not press nicely at all! I ironed the seams multiple times and the whole thing still looks like I didn't iron it once! I think the rest of this fabric might get used to make a handbag or some curtains, it's not really fit for making clothing with. 

Sunday, May 19, 2013

Ophelia

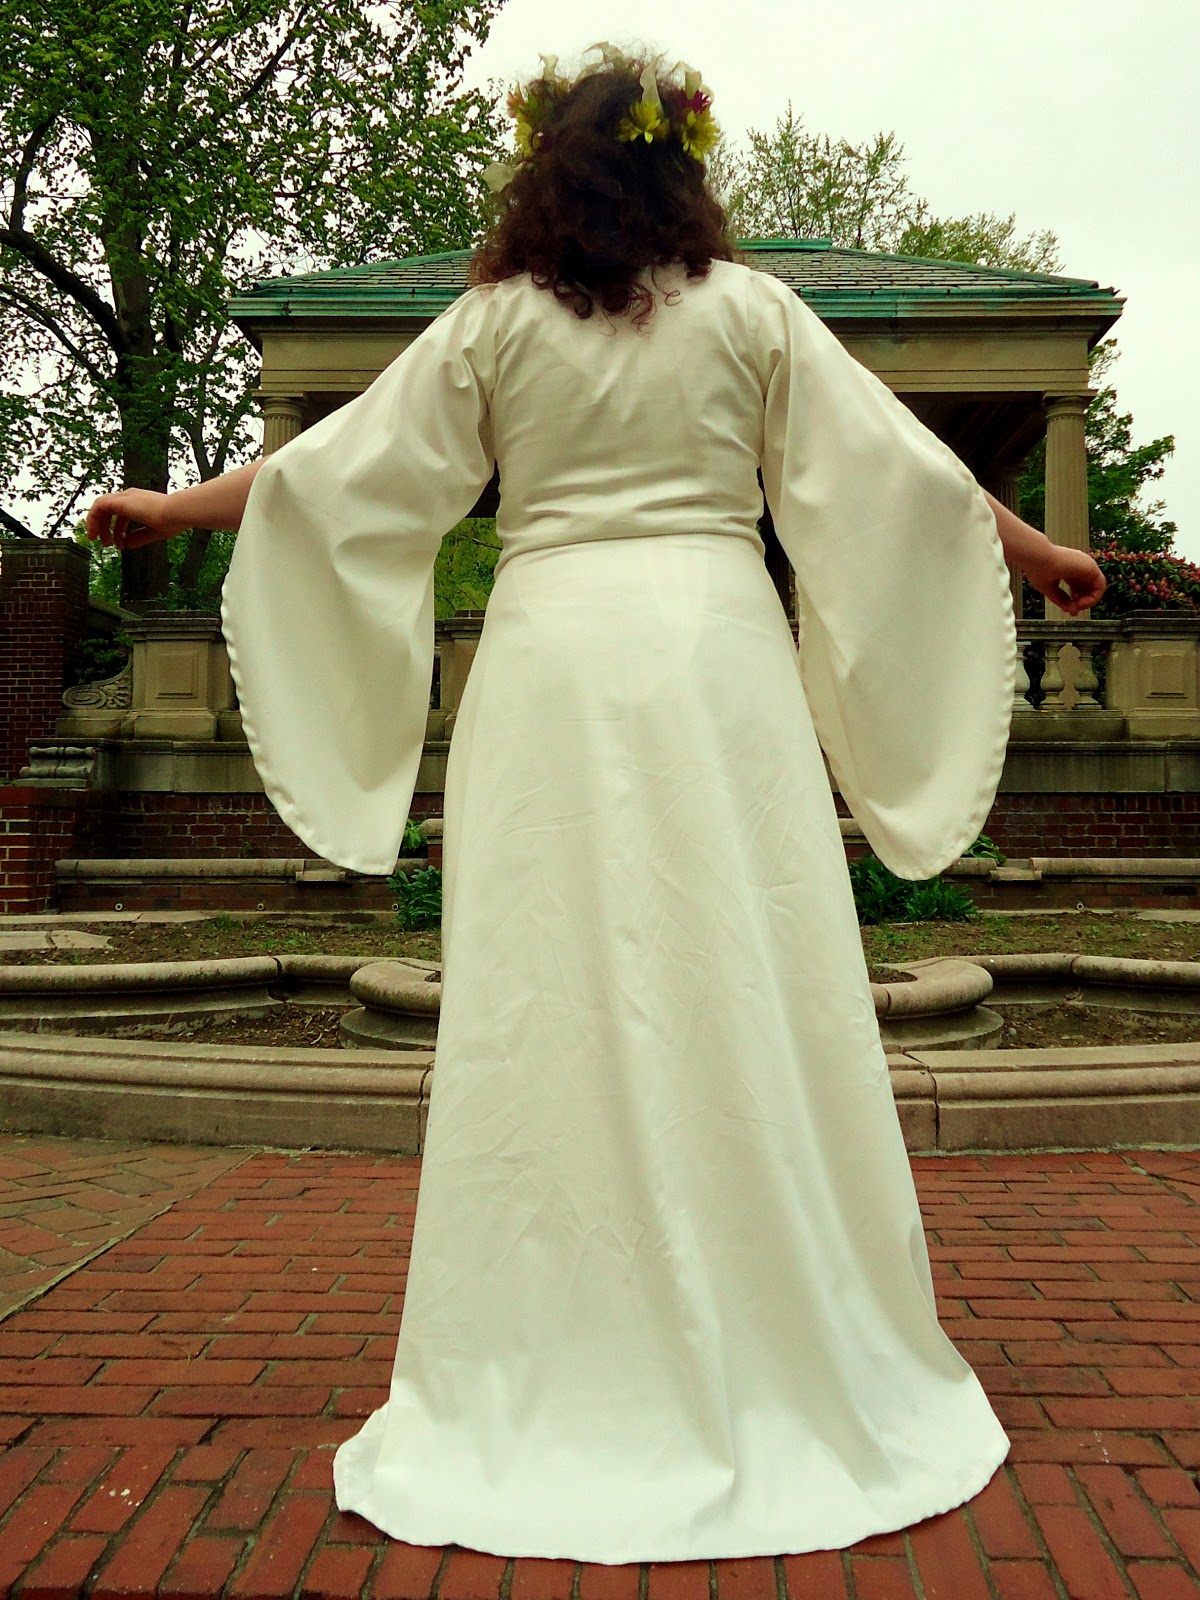
The Ophelia dress is completed and I am so happy with how it came out! This is one of the first dresses I've made that went together with no fuss at all. It was a very simple cut, so with the practice I've been getting sewing so often lately it was about time I finally got things right. I didn't have to rip out a single stitch! Best of all I finished with enough time to take a proper photo shoot.


Challenge: Literature

Fabric: 5 yards of cotton sateen

Pattern: None, based mostly off of a photo of Mignon Nevada as Ophelia in 1910

Year: Late 19th to early 20th century

Notions: Thread

How historically accurate is it? This one is more historically plausible as it was made to be a period theater costume

Hours to Complete: 4

First Worn: For a photo shoot just this morning

Total Cost: $25 in fabric, $17 in flowers for the photo shoot


The idea behind this dress was to create a costume for Ophelia as if I were a costume maker working for a theatrical production of Hamlet in the late 19th to early 20th century. I pulled inspiration from paintings of Ophelia from the time period and from a photograph of soprano Mignon Nevada as Ophelia in an operatic production of Hamlet in 1910.


 I also used my past experience in making a few medieval kirtles and houppelandes to draft the basic shape of the gown. In fact the only thing that differs from my houppelande pattern is the width and length of the skirt and train and the sleeves. In that way I could keep an accurate medieval silhouette but add a little modern twist to it. 


I had a very short amount of time in which to complete this costume - only one day in fact. I am so lucky this project didn't give me a hard time, it went together even faster than I had ever imagined. The fabric was a dream to work with too, I've never chosen a cotton sateen to work with. I chose it this time because of the recent post The Dreamstress made on historical accuracy


I had originally thought to make the dress out of linen. It is historically accurate for both the medieval period and for the Victorian/Edwardian production. Also, many theater productions wouldn't always have a big budget, and linen was an inexpensive cloth at the time. I have to admit, I just don't think I like linen all that much. Maybe it's just the fabric at my local chain of stores, but I always find it stiffer than I'd like and no matter how thick the weave is it is always see through in white. 


This time when I went to the fabric store I focused a lot more on the weight and drape of the fabric. The cotton sateen stood out for several reasons. First of all it drapes and falls gorgeously. The next most important thing was that it was far more opaque than most white fabric you find. Also it was just ever so slightly off-white which goes so much better with my complexion than a stark white would. The price wasn't too bad either, and I had a 50% off coupon for it!


I had originally planned for a small side opening in the dress with hook and eye closures. I decided on this type of closure because theater costumes often require quick changes and a side opening is much smaller and easier to get at than a back closure. I would have liked to make a laced kirtle style dress, but that was impractical for both my time limit and for a theater quick-change. 


In the end I didn't need the side closure at all. The cotton sateen was also 3% spandex, giving it enough stretch to slip on right over my head. This was probably one of the biggest factors in how quickly I was able to complete the dress, and I'm way happier with the smooth finish it leaves to the whole garment. 


I decided that I was not going to wear any corsetry under the dress. Part of that decision was because of the pre-raphaelite influence I was using for this dress. Many of the pre-raphaelites rejected the ideals of the current restrictive fashion of women's clothing. They romanticized a more medieval silhouette and style of dress and freedom from corsets. I wore just my 1860's chemise for a little more modesty.


After the dress was finished it was on to the photography! One of my good friends came down for a visit and to help me shoot the dress. I whipped up a quick headband with flowers braided into it, grabbed a bouquet and headed to the beach. 


There is a gorgeous park just a short distance from my house that has some lovely gardens as well as a great beach. We decided it would be one of the best settings for the photoshoot. 


It was crazy windy at the beach, and the sun went away as soon as we got there, but the pictures still came out great. The wind really helped to show off the movement of the dress. I fall more in love with the fabric each moment!


Thursday, May 16, 2013

Planning for Madness

I've finally figured out a quick and easy project for the Literature challenge that I'm really excited to do. I'm going to tackle my namesake, Ophelia, from Shakespeare's Hamlet. This is the perfect project for me because I have a long background in and great passion for theater costuming.

I plan on approaching this project in a sort of odd way, at least compared to how I predict everyone else is interpreting this challenge. Hamlet is set in an intentionally vague medieval time period and plays are so often set in whatever period the director feels best suits their production so I am not going to waste my time trying to pin down a specific time period for the clothing Ophelia would be wearing. Instead I am going to approach Ophelia's costume as if I were a costume designer for the theater in the mid- to late-nineteenth century. I've specifically chosen my time period because that is when the Pre-Raphaelites had a large influence on the artistic community and Ophelia was a favorite subject of many Pre-Raphaelite painters.

Ophelia by Henrietta Rae, 1890

I've chose two images to base my own costume off of. Both have influence of medieval dress and I plan to use my old kirtle pattern for the base of the costume. The first image is a painting from my time period (though not by a pre-raphaelite unfortunately, their paintings included clothing too richly decorated for my time restraints). The second is an image of an actress as Ophelia in 1910.

Mignon Nevada as Ophelia circa 1910
I plan to make a mostly plain white dress as white clothing, disheveled hair worn loose, and wildflowers were early theatrical shorthand for female madness. I have just one short day to make this costume as I want to photograph it in a setting this time instead of just on my mannequin in the dining room. Hopefully everything will go according to plans!

Sunday, May 12, 2013

Busy Busy

I had originally been planning on making a colonial Salem, Massachusetts outfit for the literature challenge in the Historical Sew Fortnightly. I live in Salem and my mother is intensely interested by the Salem Witch Trials, so I grew up knowing all the stories and lore. It's an ambitious project that would take every bit of my two weeks before the challenge up, what with having to research the types of clothing they would wear, finding suitable fabric, patterning things out mostly on my own and then sewing multiple pieces together. It's a project I don't think is possible anymore.

I just recently received my very first professional commission through my job at Frightful Acts! Over the next few days I have to quickly as possible sew together a complicated multi-layered costume. The Salem outfit will have to be put on hold until it is done. I'm trying to decide if I want to make at least a layer of the Salem costume for the challenge and leave the rest for who knows when, or if I want to pick a new project all together - a much smaller project. Anyone have suggestions for a quick sew literature dress?

Tuesday, May 7, 2013

Flora and Fauna

Challenge number 9 is completed! I worked right up until the last minute with this one, so I'll keep my post short and sweet. My entry for the flora and fauna challenge is an Edwardian vest. The vest is a little on the 'soft' entry side as I made a pattern up to fit a woman's figure and didn't really focus on making it as historically accurate in construction as I could.


The Challenge: Flora and Fauna

Fabric: A yard of floral print faux leather and a yard of striped suiting for lining

Pattern: none

Year: 1910's

Notions: thread, buttons

How historically accurate is it? I'd say maybe 60%

Hours to complete: 7

First worn: Will be worn at a galley opening in two days

Total Cost: All of it came from the stash, the leather was originally about $15, the buttons $4, and the lining was a scrap from another project, so less than $20


I'm very pleased with how the vest came out. A little ironing on the lapels and hopefully the lining will stop showing as much, but the faux leather is very hard to iron. I even found buttons to match the theme again!

Pretty girls count as fauna, right?

This vest is destined to become part of a steampunk outfit, and to make it fit me when I put a corset on I think I'm going to add straps and buckles to the sides. I had originally planned corset lacing for the back but I left the project until too late and didn't have time to attempt something so complicated. I did manage to remember to add a pocket though! It's hidden on the inside though. I wanted to try out a welt pocket, but again the leather was so difficult to iron that I scrapped that idea too. In the end I'm pretty glad I ended up with a plainer vest, it has a nice silhouette and I didn't mess it up too much!


Monday, April 29, 2013

Getting Back On Track

I've been a little lazy these past couple weeks. The only sewing I've done at all was a few hours of work on the Harley Quinn costume. I've started to pull out fabric several times these past days, but then I see the clutter obscuring my sewing table and ultimately decide to just watch another episode of Powerpuff Girls.

I've at least mustered up enough energy to figure out what to make for the Flora and Fauna challenge in the HSF. Low funds means I'm trying to work from the stash as much as possible these next couple weeks. Unfortunately I'm really not much of a floral girl, and the stash is very low on options for this challenge. I do however have a remnant of some gorgeous floral patterned faux-leather which will fulfill both Flora and (sort -of) Fauna!


Unfortunately since it was a remnant of fabric there's barely even a yard of it. I think I might be able to squeeze a vest out of the fabric though. I had been wanting to make a vest for a Steampunk outfit, so this entry is going to be more of a soft-entry. The front of the vest I intend to make as historically accurate as possible, but I want to add corset lacing to the back of the vest.


I plan to design the vest after the center image above. I like the low cut front because I intend to wear the vest with my Edwardian striped blouse and want to show off as much of those gorgeous stripes as possible. The low front designed properly could also be a little reminiscent of the dip-waist belts that were fashionable for Edwardian ladies. I think it will be an interesting challenge to take a menswear item and make it a bit more feminine too. Now to get all the clutter off my poor sewing table...

Sunday, April 21, 2013

Serendipity

Earlier this week I posted about two Harley Quinn costumes in lieu of any real sewing progress. I'm happy to report I finally got back to my sewing machine but not for the project I'm supposed to be working on unfortunately.

I live just outside of Boston so needless to say this past week has been one of the more frightening and stressful weeks of my life. Amidst all the worry and fear the very best of our community came out however. The Boston Comic Con was supposed to take place this weekend but was understandably cancelled Friday evening. Many of my friends had been planning to go and were very disappointed. That is when the artistic community in my area sprang into action.

Just a few short hours after they announced that the convention was cancelled plans were already underway for our own home town version. Local artists were contacted, a gallery space was donated and invites were sent out in droves. In less than twenty-four hours we pulled together an amazing group of people for the Beverly Comic Con.

I found out about the event through friends and facebook late Friday night. Having just posted about the Harley Quinn costume it was fresh in my mind and this would be the prefect excuse to fix it up and show it off again. Saturday morning I got straight to work with a 4 pm deadline for the start of the event. 

The bolero top was my main focus for fixing up. I was in a rush the first time and when the sleeves didn't fit quite right I made a quick and dirty fix for them. It looked alright, but it wasn't what I wanted the sleeve to look like at all. Luckily I had an extra yard or so of fabric to make a new set of sleeves out of. The corset also needed a couple repairs where bones had ripped out of their casing because of some inferior twill tape. I worked right down until the last second but was so happy with the results!


Since I was replacing the sleeves anyway I took the opportunity to add another color switch to the pattern. The sleeves had been a solid color from top to bottom last time, but I think they look much nicer now. 


Another change I made to the bolero was in the neckline. It was cut kind of high before and instead of staying up around my neck like it was supposed to it just flopped downward sadly, so I cut it down into more of a V-neck. That left the original lace trim a little short. I had an extra piece of it, but it was also short and I didn't want a visible break in the trim. 


My solution was pretty simple, but I love the look of it. I cut the extra trim I had in half and pleated it onto each center front of the neckline. I was able to tuck the ends of each piece of the trim underneath so that it looks more like one flawless piece and the pleating adds a bit more interest to the neckline.


I'm really happy that I got a chance to properly photograph the costume as well, and the people at the convention were so happy to have a cosplayer there! Overall the event was amazing. To see people come together to pull off something so amazing is really awe-inspiring. I only regret that I forgot to take pictures at the convention!!

As for the Historical Sew Weekly Challenge I was supposed to be working on, it's pretty obvious that I will be missing the deadline for this one. I might see what progress I can make tonight and tomorrow, but I don't even really have fabric yet. Maybe I'll complete it another time. Hopefully I will get myself back on track for the next challenge though.

Sunday, April 14, 2013

Past Projects: Harley Quinn Times Two

I'm still getting over whatever sickness struck me down this past week, so sewing progress has been pretty much non-existent. So instead of a new project I bring you another entry to the series of past projects; Harley Quinn done two ways! For those of you not as nerd-savvy, Harley Quinn is a Batman villain most often seen as the Joker's lead lady. Her name of course is a play on harlequin as is her costume.

Harley's original costume

As it is with most comic book characters, her costume has been re-imagined many times for different series and different medias. Last year in the fall I had a video-game themed costume party to attend and was having a hard time coming up with a costume. A lot of video game ladies have costumes that show off a bit more skin than I'm frankly comfortable with, and the other choices like Princess Peach didn't really resonate with me either. I was already planning my own interpretation of Harley for a halloween party a month or so later, so I looked up what Harley's costumes looked like in the newer Batman games Arkham Asylum and Arkham City. The Arkham Asylum costume was just awful and not something I wanted to wear, but the Arkham City costume had great potential. It was sexy and just a little revealing without being ridiculously over the top.

Harley in Batman: Arkham City

Of course by the time I had finally settled on what costume to make I had precious little time left before the party. I whipped up a red corset using one of my victorian patterns cut down to be an under-bust corset. If I ever have a little extra time I would like to go back and make one with the straps that Harley's has, but the one I made was passable. Most of the costume was pretty easy, I had an old pair of black skinny jeans hanging around that got one leg painted red, and a pair of knee high boots got the same treatment. The first tank top I made for the party was made from a red and a black tank top I had laying around, cut in half and sewn back together. The red of the tank top didn't match though, so I made a new one for the next use of the costume.

Completed Arkham City costume

Shortly after the video game party I went to a convention with Frightful Acts. One of my co-workers is a huge superhero fan and has several of his own Batman and Superman costumes, so I brought along the Harley costume as well. It was impressive enough that I got interviewed by the Boston Phoenix for a small online article about costumes at the convention!

After the convention was over I had just one or two very short weeks to complete my plans for Halloween. I had decided months before I even thought of the video game Harley Quinn costume that I wanted to make a more Victorian inspired version of Harley. I had been thinking I could use the same corset as the first costume, but I really wanted to do a full party-colored outfit. I tried out a new corset pattern for the second costume that ended up really flattering the look well.

My own version of Harley

The bolero top has a few issues, but the corset and skirt came out perfect. There were even a few girls drooling over this costume at the next convention I went to! Unfortunately I didn't get to do a proper photoshoot with either of these costumes, but at least there's a little photographic evidence.


 Hopefully my next update will be progress on the victorian bathing costume I'm planning. I've got the pattern and should get a chance to buy the cloth tonight.

Sunday, April 7, 2013

Challenge #7 - Accessorize

I've been feeling quite under the weather this past week, so for challenge number seven I just have a small entry. I was having a hard time deciding what to do for the challenge since I tend to focus on clothing more than the accessories that go with it. When I saw the Dreamstress's post about the bum-rump she made I realized I had a corset pattern I've been meaning to make that included bust and hip pads. I would have needed to make them eventually, and with the way I've been feeling I decided they would be perfect for the challenge.


The Challenge: Accesorize

Fabric: 1/4 yard linen-look fabric

Pattern: Truly Victorian Edwardian Corset

Year: 1901

Notions: Thread, Bias tape

How Historically Accurate is it? I think the fabric has synthetic content that might be iffy for this time period, but it's pretty close to fully accurate.

Hours to Complete: 1

Total Cost: Everything came from the stash, so $0!

I haven't gotten around to the bust pads yet, but the bum-rump came out great! I realized halfway through that the ever-present half full bag of fiber-fill I thought I had was missing so I came up with a thrifty solution. I usually leave a paper bag near my sewing table to throw small scraps of cloth in. I rarely use them but can't always bring myself to throw it all away. My hoarding tendencies paid off this time as I just shredded up a bunch of the scraps to fill the pad with instead. It made the pad a little on the lumpy side, but it will have a couple layers of cloth over it to hide that. Plus I have a feeling the scrap fabric might be a bit more historically accurate than the polyester fiber-fill I had planned to use.

Monday, March 25, 2013

Stripes!

My striped blouse is finished! I'm really glad I decided to use this fabric for a blouse instead of the corset I had planned at first, it's just too gorgeous to hide away. I still desperately need to make the corset, but I can find another challenge to fit it into. I also have some loose plans underway for my next steampunk outfit featuring the lovely striped blouse I just finished. But enough of my chattering, on to the details!


The Challenge: Stripes

Fabric: 2 1/2 yards mystery cloth, there was no label but it's definitely synthetic

Pattern: Truly Victorian TVE41 1903 Plain Blousewaist

Year: 1903

Notions: Thread, buttons

How historically accurate is it? Besides the mystery fabric it's pretty much completely historical.

Hours to complete: Around 6

First Worn: Just to snap a quick photo

Total Cost: about $30


This is my second time making this pattern and it was a breeze this time through. I altered the pattern just a bit to take a couple inches of width out of the shoulders. It sits a little funny on my mannequin but fits me just fine, I must have narrower shoulders than I thought. My mannequin also has a rather thick neck, thus the top button won't button on her. Speaking of buttons, I even found striped buttons for my striped shirt!


They're a nice little subtle touch to the design I think. I'm fairly certain the buttons are plastic but they look fairly convincing as brass.


The fabric I used is a bit stiffer than the linen I used the first time around, and the sleeves just have a beautiful shape to them now! The stiffer fabric really helps the round fullness of the bottom of the sleeve.


I'm excited to plan out a full outfit for this blouse! It looks pretty good already with my black skirt, but I was thinking of making a leather vest to go with it for a steampunk outfit. I might make a blue skirt to go with it. I'll have to see what fabric I can find I guess. I'm just excited the blouse turned out so well, I have a feeling the next challenge will give me some difficulty. For starters I don't even know what I'm making for it yet!

Saturday, March 16, 2013

A Dilemma

Earlier I posted about a gorgeous striped fabric that I found for a bargain a few weeks ago. The plan was to make a corset out of it because the next challenge is stripes and my wardrobe desperately needs a straight-front corset. Then I finished the blousewaist for the previous challenge and I started feeling a little fickle.

The fabric in question

I really need to make the corset, but it's such a gorgeous fabric to use on something that will be hidden away. The pattern for the blousewaist called for close to 4 yards of fabric, but after making it nearly half the fabric hadn't been touched. There is just over two yards of the striped fabric so with a little craftiness I may be able to fit the pattern on it. I'll have to make the adjustments needed to the pattern and lay it all out to see if it fits. If a blouse isn't possible out of the fabric, I'll just have to default back to the corset.

On the brighter side a spontaneous trip to an antique store this morning yielded an amazing costume find. I had been going to this particular store because the last time I visited there was a collection of antique laces and trims. When I arrived this time I found it all gone however. Somewhat discouraged I took a quick spin of the place in case it had moved and found two baskets of old linens. I dug through them for a bit in case some lace was hidden but instead I found a gorgeous pair of crocheted gloves!


I really don't know all that much about gloves and I'm having a very hard time finding more than just a general overview of their history. I think crocheted gloves came more into fashion around the Regency era though, right? Could anyone with more knowledge than me help me out?


They fit me great though! Every time I find a pair of pretty kid gloves they are just way too small for me, but the crochet stretches just enough to fit. I'm excited to have such an elegant new accessory for my wardrobe.