Monday, March 25, 2013

Stripes!

My striped blouse is finished! I'm really glad I decided to use this fabric for a blouse instead of the corset I had planned at first, it's just too gorgeous to hide away. I still desperately need to make the corset, but I can find another challenge to fit it into. I also have some loose plans underway for my next steampunk outfit featuring the lovely striped blouse I just finished. But enough of my chattering, on to the details!


The Challenge: Stripes

Fabric: 2 1/2 yards mystery cloth, there was no label but it's definitely synthetic

Pattern: Truly Victorian TVE41 1903 Plain Blousewaist

Year: 1903

Notions: Thread, buttons

How historically accurate is it? Besides the mystery fabric it's pretty much completely historical.

Hours to complete: Around 6

First Worn: Just to snap a quick photo

Total Cost: about $30


This is my second time making this pattern and it was a breeze this time through. I altered the pattern just a bit to take a couple inches of width out of the shoulders. It sits a little funny on my mannequin but fits me just fine, I must have narrower shoulders than I thought. My mannequin also has a rather thick neck, thus the top button won't button on her. Speaking of buttons, I even found striped buttons for my striped shirt!


They're a nice little subtle touch to the design I think. I'm fairly certain the buttons are plastic but they look fairly convincing as brass.


The fabric I used is a bit stiffer than the linen I used the first time around, and the sleeves just have a beautiful shape to them now! The stiffer fabric really helps the round fullness of the bottom of the sleeve.


I'm excited to plan out a full outfit for this blouse! It looks pretty good already with my black skirt, but I was thinking of making a leather vest to go with it for a steampunk outfit. I might make a blue skirt to go with it. I'll have to see what fabric I can find I guess. I'm just excited the blouse turned out so well, I have a feeling the next challenge will give me some difficulty. For starters I don't even know what I'm making for it yet!

Saturday, March 16, 2013

A Dilemma

Earlier I posted about a gorgeous striped fabric that I found for a bargain a few weeks ago. The plan was to make a corset out of it because the next challenge is stripes and my wardrobe desperately needs a straight-front corset. Then I finished the blousewaist for the previous challenge and I started feeling a little fickle.

The fabric in question

I really need to make the corset, but it's such a gorgeous fabric to use on something that will be hidden away. The pattern for the blousewaist called for close to 4 yards of fabric, but after making it nearly half the fabric hadn't been touched. There is just over two yards of the striped fabric so with a little craftiness I may be able to fit the pattern on it. I'll have to make the adjustments needed to the pattern and lay it all out to see if it fits. If a blouse isn't possible out of the fabric, I'll just have to default back to the corset.

On the brighter side a spontaneous trip to an antique store this morning yielded an amazing costume find. I had been going to this particular store because the last time I visited there was a collection of antique laces and trims. When I arrived this time I found it all gone however. Somewhat discouraged I took a quick spin of the place in case it had moved and found two baskets of old linens. I dug through them for a bit in case some lace was hidden but instead I found a gorgeous pair of crocheted gloves!


I really don't know all that much about gloves and I'm having a very hard time finding more than just a general overview of their history. I think crocheted gloves came more into fashion around the Regency era though, right? Could anyone with more knowledge than me help me out?


They fit me great though! Every time I find a pair of pretty kid gloves they are just way too small for me, but the crochet stretches just enough to fit. I'm excited to have such an elegant new accessory for my wardrobe.

Wednesday, March 13, 2013

Peasants and Pioneers Finish

I finally managed to wrestle this project back under control. I'm very happy with how it came out - on a mannequin at least. It does not fit me right, but it still looks pretty on display. But first, how about the details?


The Challenge: Peasants and Pioneers

Fabric: 2 yards white linen, 3 yards black synthetic linen (from my stash)

Pattern: Truly Victorian TVE41 1903 Plain Blousewaist and Folkwear 209 Walking Skirt

Year: 1903

Notions: Thread, buttons

How historically accurate is it? About 75%, the skirt is synthetic fabric and I took a couple shortcuts with seam finishes on the blouse when I ran out of time, but the overall silhouette and look is correct

Hours to complete: I lost track completely but maybe 12-15

First worn: Not yet

Total Cost: Used a lot of stash items this time, spent $20 on fabric and $15 on one pattern

I started with the skirt which I was most excited to make since I figured it would be good for my everyday wardrobe as well as costumes. I borrowed my mother's old Folkwear pattern for the skirt, which was my first mistake. The pattern is really old and the sizes were all too small for me. The largest size waist was 28 inches, yikes! I added half an inch to each skirt panel to fix that problem, but my next issue was a missing pattern piece for the waistband. No problem I thought, it's just a rectangle. I thought I measured it out right, but when I got the skirt together it was way too small. It doesn't even fit my mannequin.

The good thing about the skirt is that I used up some old stash fabric, a linen-look synthetic fabric that had been sitting around for years. I could probably just remake the waistband, but the skirt is also too short for proper Edwardian dress. The pattern came in two lengths, floor length and street length. I thought the street length would be at the ankles like the women's skirts in the photos I have, but it's more like mid- to low-calf length. I might just make a waistband for it and add it to my normal wardrobe and make a whole new walking skirt later.


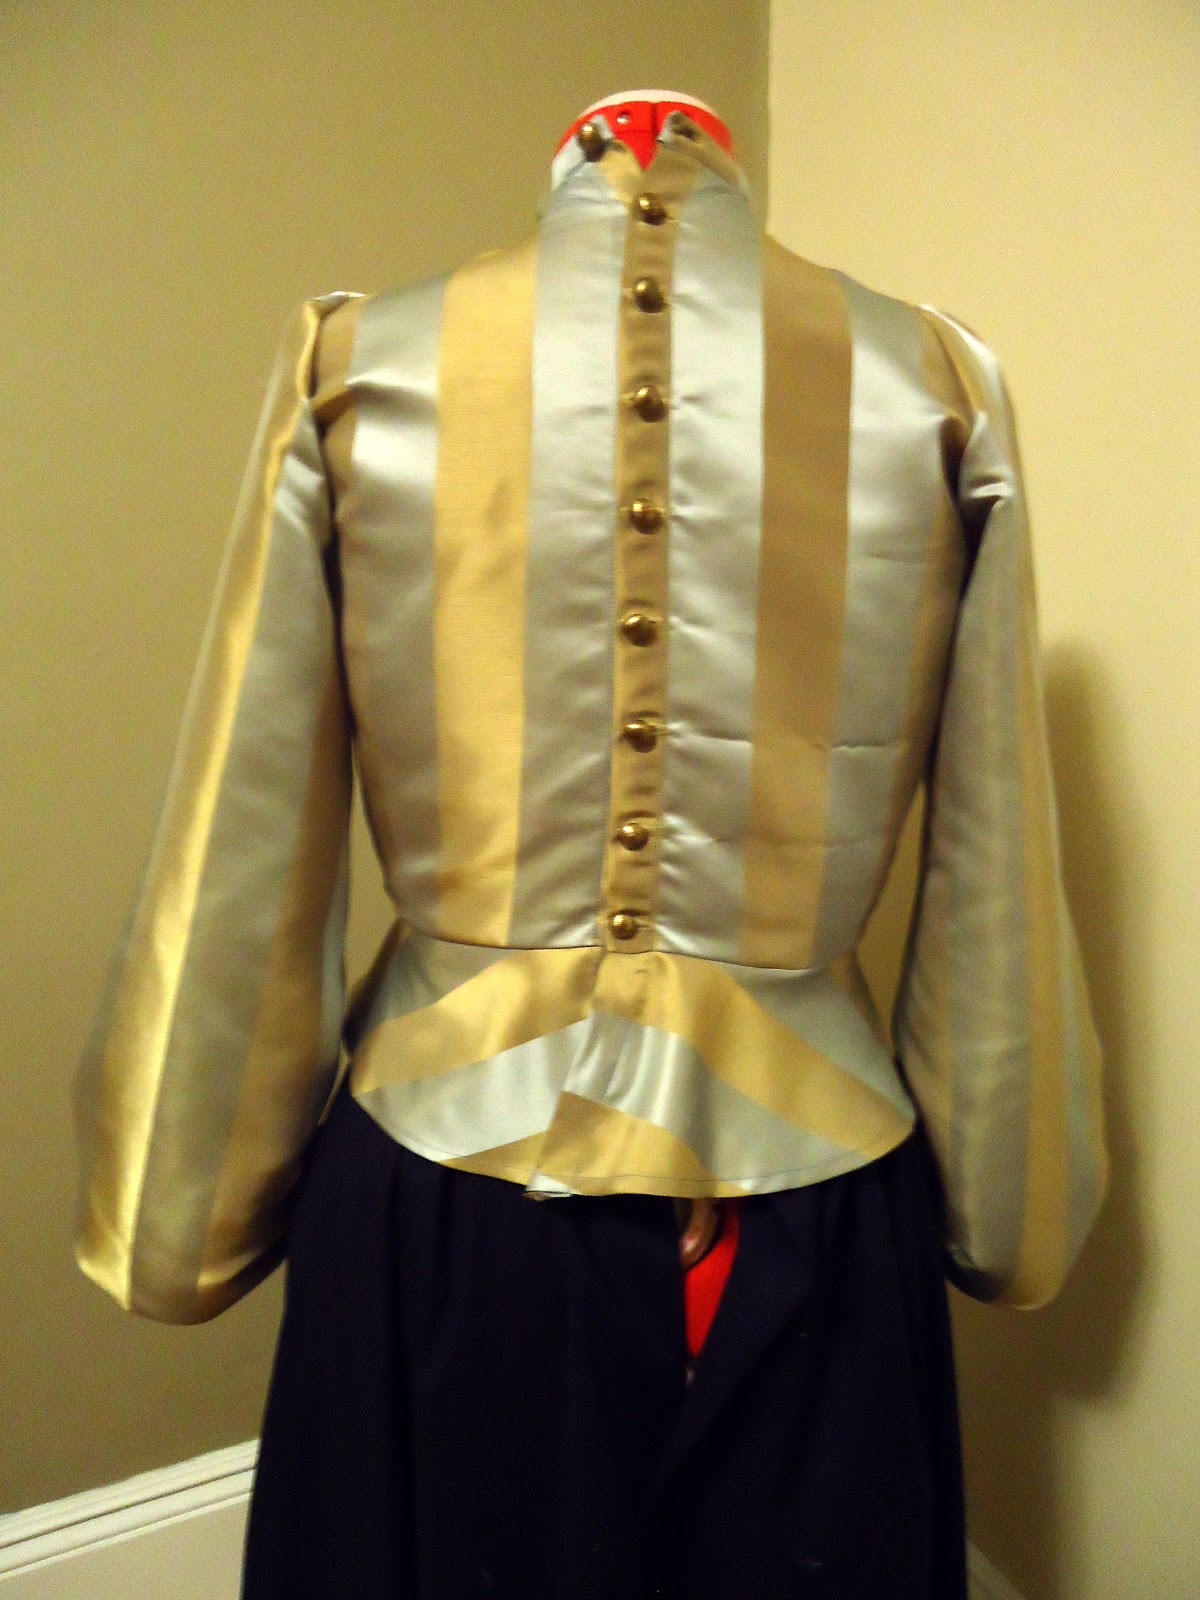
The blouse started out fairly easy though I spent forever procrastinating on starting it. This was my first time using a Truly Victorian pattern and I found some of the same issues I have with every pattern. I really like their customizable sizing chart and directions for tailoring. I missed having a 'general directions' section and a cutting layout like most commercial patterns have though. There was no real set up of the pattern, just instructions on how to change it and nowhere in the directions did it say that the sleeve, though drawn in two separate halves needed to be cut out as one piece. It wasn't a big error though and I was able to use it the way I had cut it. I also wish they had a few more diagrams to go along with their often short instructions.

That being said, I love how this blouse came out. Linen isn't my first choice of fabric, but since it was part of the challenge I used it. I found the linen I had a little stiff for the shirt, the overlap in the front tends to stick out a bit more than I feel it should. I want to make this blouse again in a silky draping fabric.


I also love the little row of buttons down the back. I decided to add just a little pop to my blouse by adding silvery grey-black buttons, a simple little embellishment that could make a plain working girl's shirt feel just a bit more elegant. I also forgot to buy buttons when I was getting the fabric, and only had black or red in my stash.


The blouse fits almost perfectly, but it is too wide in the shoulders. It's an easy fix if I ever get around to it, but I was viewing this version more as my mock up for the blouse since I didn't have time to make one. Now I know the pattern and where I need to change it, and I can make a bunch more even more gorgeous than this one. 


Overall I really liked this challenge. The simple silhouette of a working class wardrobe is actually more appealing to me that I would have at first thought. I think there will be lots more simple Edwardian skirts and blousewaists in my future, they are fairly simple to make and I just love the look of them. I am a little disappointed that I didn't end up with a wearable costume though, but I can either sell or fix the pieces I made so not a total loss.

Monday, March 11, 2013

Peasants and Pioneers Update

Well, I won't be meeting the deadline for Peasants and Pioneers. A combination of friends coming from out of town for a visit and just plain needing a 'mental health day' stalled any progress I had hoped to make this weekend. I made my best attempt at finishing the blousewaist after work tonight, but there just wasn't enough time.

The unfinished project

That being said, there isn't all that much left to do. I need to set the sleeves and add buttons to the back closure and make the attachable collar and then the blousewaist is done. The skirt still needs its waistband and to be hemmed, but none of these tasks should take too long. I definitely want to finish this project because I plan on making an early 1900's corset for the next project and these are the only Edwardian clothes I have made so far.


I know I won't be able to work on any sewing tomorrow night, but Wednesday should be free as far as I know right now. I'll post all the specifics as soon as I finish the project, tentatively on Wednesday night. Then it's on to a sumptuous striped corset!

Saturday, March 9, 2013

Slow Progress

It's been a busy week, but little progress has been made on any of my sewing. Last weekend I started my Peasants and Pioneers project and got most of the skirt done, but it sat untouched the rest of the week. All it needs is a waistband and to be hemmed though, so not that much work left. Unfortunately I used a pattern that was once my mother's and the waistband piece has gone missing, but from the diagrams it looks like it's just a rectangular strip and very easy to remake.

The almost finished skirt

I'm afraid it is going to be too short but we'll see what happens when I put the waistband on. Luckily because of the nature of this challenge I feel like I could easily just add a strip of fabric at the bottom to lengthen it until there's time to make a new one. A lower class working girl might have to patch old clothes or fix a hand-me-down to make them fit right if she couldn't afford a new one, and this challenge is all about the lower class.

One big errand that did get done this past week was a trip to a new fabric store a customer had tipped me off about. There's a store about 45 minutes away from me that sells mostly interior design fabric, and up on the third floor attic of the place they have stacks and stacks of old remnants all priced at $9 a yard. That's a steal for a lot of the fabric buried up there. I went there to try and find striped fabric for a dress I wanted to make for the next challenge. I failed at that task but did get some striped fabric that I might use for a different project and some fabric I intend to use for challenge #11 squares, rectangles and triangles.

Gorgeous Ginkgo leaf patterns

I really want to make a kimono out of this fabric. The pattern is nice and large and loose and I love the little background swirls. The interior of this fabric is very metallic and scratchy though so I'll have to line it most likely. I'll decide what specific style of kimono I want to make when the challenge is a little closer. I'm leaning toward a shorter version of a kimono that would be worn as a coat so that I could use it in everyday wear. I just don't see myself ever having a place to wear a full kimono to.


I also grabbed this stunning wide striped fabric while I was going through the discount racks. It's a pale blue and gold striped fabric, but there was only two yards left. That's not really much to work with considering I had wanted to make a full dress for the stripes challenge. 

From the book Fashion The Definitive History of Costuming and Style

I recently bought a Smithsonian fashion history book and found this gorgeous striped frock in it. I've been looking absolutely everywhere for an appropriate fabric to recreate it with but can't find one anywhere. At this point there's not really enough time or money to get the fabric for it and figure out a pattern so the idea will probably have to be scrapped until later. I do however have the gold and blue fabric and a pattern for a 1903 Edwardian corset that my wardrobe desperately needs, so I might just settle for a striped corset. 

Tonight I start on the blousewaist for my Peasants and Pioneers outfit. I'm hoping it goes together fairly easily but we'll see. I bought a pattern for it from Truly Victorian but I've never used their patterns before so this will be a bit of a learning experience. Tomorrow I'll finish the blousewaist and skirt off and hopefully be able to post about it.

Sunday, March 3, 2013

Dressing Gown Tutorial

Since there's been a lot of interest in my 1930's dressing gown I'm posting up my first tutorial. I'm way later than I wanted to be posting this, but I found it a lot harder to write this up than I thought it would be. I'll attempt to guide you through my pattern drafting process in a way that will hopefully make sense. I'm mostly self taught and fairly new at drafting my own patterns, so hopefully my methods aren't too unconventional. Let's start with the inspiration garments however.


I found this dressing gown here, and there are a lot more images of it and the matching nightgown at the website. This next image comes from an etsy seller who seems to have sold it since I can't find the page anymore. 


I really liked the little dip in the back which you'll see in my pattern pieces, and I wanted the lace detail to go all the way around the waist which it doesn't seem to in the first example.

Now on to the pattern. I started with the waistband which is fairly simple. I took measurements of myself just under my bust and then at my waist just below my bellybutton, which is about where I wanted the waistband to end. My underbust is 34 and my waist is 36. I added two inches to each measurement for seam allowances and then divided each number in half. I also figured out about how thick I wanted the waistband to be at the sides and decided on 4 inches, plus one inch for seam allowances, so 5.

I drew two parallel lines on a sheet of paper, one 19 inches (half my waist plus two measurement) and one 18 inches. The lines were 5 inches apart and I matched their centers, so the top line was an inch shorter than the bottom line on each end. I connected the two ends of the lines with a diagonal. For the back piece I measured 1 inch down from the center of the bottom line for the dip.

The back waistband piece

For the front waistband piece I took the same base shape and measured 7.5 inches up from the center of the bottom line. I cut the shape in half and then added 1 inch of width to the center for overlap at the center closure.

The front waistband piece

The upper front bodice

The pattern for the upper bodice starts with a pretty basic shirt shape for the armscye and shoulder. I pinned a mock-up of the waistband on to myself and measured from my armpit to the waistband (plus an inch) to get the 6.5 side length. I measured from my shoulder down over my bust to the waistband (plus an inch) for the 14.5 center length. The bottom edge of the piece is 3-4 inches longer than the front waistband piece to allow for gathering. 3-4 inches extra worked well for my B cup, I would suggest an extra two inches at least per cup size larger.

The upper back bodice

The back piece is almost the same as the front but with a straight line at the bottom and side. It is a few inches wider than necessary to allow for light gathering into the waistband. I cut this piece out on the fold of the fabric.

Those are the only pattern pieces I made, the skirt was just a basic rectangle pleated into the waistband. My rectangle was about 42 inches long by 90 inches wide to allow for a lot of pleating. I cut two 42 inch long pieces from my skirt fabric which was about 45 inches wide. One piece stayed whole and became the back of the skirt and the other piece got cut in half for the separate side front pieces. This made two side seams in the skirt that I could put pockets into.

The main construction of the gown is fairly straightforward. I sewed the waistband pieces together at the sides with flat felled seams and then sewed the back and front bodice pieces together with flat felled seams as well. I sewed the gathering lines into the upper bodice stopping at each side seam to allow the front and back gathers to be adjusted separately. For the front pieces I gathered the most in the center of the piece, leaving both sides relatively flat. It gives a nicer shape to the bust and looks like what they did in my example piece. I used an overcast stitch to finish this seam which might be a little questionably historical, though overlock machines were being used in factory manufactured clothing at the time.

I sewed the skirt side seams together and sewed the pockets in before I sewed the skirt to the waistband. My skirt had two layers of fabric, the opaque satin and the see through organza. Both layers are sewn together at the pocket opening and above but I left them separate from each other below that.

After all the pieces were sew together I cut a strip of my satin on the bias to use as a facing for the neckline. I made a small hem on one side. For the neckline I pinned the bias piece to the gown with wrong sides together and sewed a scallop satin stitch and then trimmed away the excess. 

The inner facing

The next step was adding the lace overlay to the waistband. I laid the pattern pieces under my lace and cut out the general outline following the flowers in the lace, never cutting through a flower. This gave me the little pieces that stick up and down around the waistband. I was going to sew it on by hand but got lazy and sewed around the top and bottom where the seams for the waistband underneath were and tacked the extra flowers to the rest of the garment. My lace overlay came up a little higher than my original waistband at the front point but I liked it better that way. I also exaggerated the point in the back when I cut out the lace.

For the front opening on the side where the buttons would go I sewed a strip of the hemmed bias piece on with right sides together and then turned and pressed it and tacked down the corners. For the loop side of the closure I pinned the loops to the dress facing in then pinned the bias strip on top and sewed it all together. When turned the loops poke out. The corners of this bias piece got tacked down as well.

Detail of the loop side

The sleeves of the gown were two rectangles of organza cut a few inches longer than my arm. I cut a small curve into the corners of one end to line up with the bottom curve of the armscye and pleated in the excess around the top of the shoulder. I sewed elastic into the bottom edge and lace over that.


And there you have it! A nice comfy dressing gown to lounge around looking fabulous in. Hopefully I've explained everything well, please feel free to contact me with any questions or clarity issues you might have.